I love discovering things that make life work just a little better. I'm a proponent of free access to solid information. Enjoy your time here and do visit often!
My family has elevated sweaty grimy greasy stains to an art form! This, combined with a limited budget for replacing clothing, has motivated me to find an all in one stain removing system that is easy and effective. I’ve used this recipe on jeans, brightly colored clothing and whites. I’ve not used it on many delicate fabrics, but if the garment was unusable because of an unsightly stain, I would give it a try. On the occasion that a stain is so firmly set that it will not be removed, I either dye it a darker color or send it to the scrap bin.
You will need two 5-gallon buckets with lids.
Combine the Following: °2 cups borax °2 cups washing soda °1 cup OxiClean® °1 cup Cascade Complete All-in-1 Gel °1 cup hydrogen peroxide °2 cups vinegar °1 to 2 gallons of HOT water
Gradually add 1 to 2 gallons of HOT water while stirring the mixture. Be sure to stir well or the powder will clump into hard lumps. If this happens, you should be able to smash the clumps against the side of the bucket with a wooden spoon. Place the garments you wish to soak into a separate 5 gallon bucket. If I have a lot of items, I sometimes use 2 buckets, one for whites and another for colors. Pour the liquid over the fabric in the bucket. If using 2 buckets, equally divide the solution among them. Add more hot water so that the fabrics are immersed. Cover the bucket and allow it to soak overnight.
The next morning, dump the contents of the bucket into your washing machine (or wash tub) and send them through a rinse and spin cycle. Then, wash the clothes as you would normally. This works great for socks, dingy undershirts and linens. It would even be a good tool to use on yard sale finds.
This formula has evolved over time. Feel free to adjust it to suit your own needs.
Knowing how to darn can allow you to extend the life of garments and linens around your home. With a little patience and a few tools, you'll be able to gain the experience you need to become skilled at darning fabric.
WHAT YOU'LL NEED A DARNING EGG The purpose of this tool is to rest against the wrong side of your fabric and provide you with a firm surface while you work on the right side, mending the hole.
If you don't have a darning egg, that's okay. One can easily be improvised. Ceramic or plastic eggs can be used as well as old door knobs and even light bulbs. For small holes, you may find you are able to do without and just use your hand.
THREAD TO MATCH YOUR FABRIC This is important as you don't want to create a lumpy mend, by using a thread that is too bulky or too thin, especially if you are repairing socks or an undergarment. I find that cotton sewing thread works well for socks. Heavier gauge quilting thread works well for canvass or heavy jean materials. Yarn is used for crocheted or knitted work.
A NEEDLE TO MATCH YOUR THREAD If your needle is too small, you will find it difficult to get your thread into the eye. If your needle is too large, you may find yourself fighting to force it through the fabric, especially when the bulk of the needle's eye passes through.
A RUBBER BAND OR TWINE This is to secure your fabric taught over your darning egg. You don't want to place this too securely, and you CAN do without it. I find that with small holes, it is nice to have the egg stable, not sliding around behind the work. A rubber band helps secure your work to your egg. If your hole is very large, you may not want to use a rubber band, as it may push your egg through the cloth.
SOMETHING WITH A HOLE IN IT A sock is a good starting project. It's very forgiving. If you are not well pleased with your results, no one will see your first attempt. If you must throw it out and start over, it's no real loss. Additionally, these usually present the beginner with small holes to gain experience before someone accidentally manages to rip your upholstery. Consider using a sock that has a contrasting color to your darning egg. It will make it easier to see your thread.
To begin your project, choose a well lit area where you are comfortable. I find that when I'm learning a new skill, it is helpful to select a less hectic time of day when I have fewer interruptions. (That almost made me laugh when I typed it.) If you are a mom, this is a relative thing. Just assemble your materials near your favorite chair and steal a moment when you are able.
STEP 1 -- WARP YOUR LOOM Do what to who? I know we aren't learning how to weave on a loom here, but the principle is the same. Just as you would place your warp thread on a loom using a figure eight pattern, you will do this with your darning. The fabric is your loom and your thread, at this stage, is your warp yarn.
Use your needle to go under the edge of the fabric and come back out the right side. Then go back down into the hole of the garment with your needle, under the opposite edge and repeat. This creates a figure 8 looping as you see in the illustration. Be careful to work far enough beyond the edge of the hole so that you are anchoring your warp into secure stitches.
Take care not to pull the thread too taught as you will want to keep the same tension as the garment and surrounding fabric. This will keep it from puckering when you begin to weave in your weft thread.
STEP 2 -- WEAVE IN YOUR WEFT I know, again you're thinking I've left the topic. No, the weft yarn is your same thread now working in a horizontal over and under pattern. Use the point of your needle to weave over and under the warp threads. You can also use your needle to push the weft thread snug against the warp as it is threaded back and forth. At the end of each row with your weft, use your needle to place an anchoring stitch into the garment.
Continue alternating your weft over and under the warp threads in alternating patterns until the hole is mended.
Here's a video of a woman darning a knitted sock. She uses a darning mushroom. It has a larger and flatter surface, very similar to a doorknob.
Putting away the clean laundry may not be a favorite task. This chore can be time consuming, especially in large families. Here are a few tips and tricks that may lighten your load:
Try not to let things pile up. It's just easier to find 30 minutes in a day to devote to folding and putting away a basket or two of laundry than it is to face a mountain once a week. The dread of tackling it all at once is daunting (and draining).
Realize that you are saving yourself some time in the long run. Neatly sorted drawers allow you to quickly locate items and do a quick inventory of the clothing needs of your family. Additionally, clothing fits into the drawers more easily and saves you the trouble of having to repair furniture that has been overstuffed with items squashed and crammed into the space. Knowing how to fold and put away items will also save you some time later as these will need little or no ironing.
Enlist helpers. Small children just LOVE to be given a little basket all their own to 'help' mama. Give your toddlers a five or six small items to 'fold.' I loved watching mine do this when they were younger. They would try to snap the wrinkles from a washrag or dish towel, then squish it into a ball (their version of folding) and toss it back into their little basket. It kept them busy and bought me some uninterrupted time. They were working with mama and that meant the work was important. Sure, I often ended up having to re-wash a few things that got soiled from being rubbed by dirty hands (or on a dirty floor), but the fellowship made it well worth the price. . . And it kept them out of my larger basket. *wink*
Play fun music or sing your favorite song while folding laundry. Try keeping up with the beat of the songs. This helps things move more quickly.
Focus on the simple pleasures rather than the drudgery. The smell of clean laundry IS pleasant. Enjoy that scent and think about the loved one that wore the garment. This may be a good time to pray for that person.
Greet this time as a well-earned break. Honestly, there isn't much brain-work to folding laundry. This is free time with a purpose. Daydream a little. Train your brain to think about the joys in life. Mama's get so little uninterrupted free time. Folding the laundry provides you with a legitimate reason to sit and rest a while. You might begin to dread finishing . . . It could happen. *smile*
The bits of clothing that have been a great challenge to me have been shirts and socks. I saw a video once where the punishment for evildoers was to sort through a bottomless pile of mismatched clean socks! I COMPLETELY understood that reasoning. *snicker*
Believe it or not, there IS a way to fold socks so that they will fit neatly into that tiny sock drawer, AND you shouldn't have to unfold them to see which socks are which. If you've ever had to find a pair of socks at the last minute, you'll really appreciate having them sorted, folded and ready. Here's a video I found about ONE way to fold socks (although it isn't the ONLY way):
Shirts are also a laundry-folding challenge. Whether you are dealing with stretched-out t-shirts or buttoned shirts, folding them without wrinkles can be difficult . . . That is, UNTIL NOW.
I found this video on how to fold shirts in just seconds. You literally pick up the shirt at two points and lay it back down folded. Your kids will think you are magic and want to try it themselves (really, you SHOULD let them *wink*). Sound impossible? Click on the video below to see how it's done:


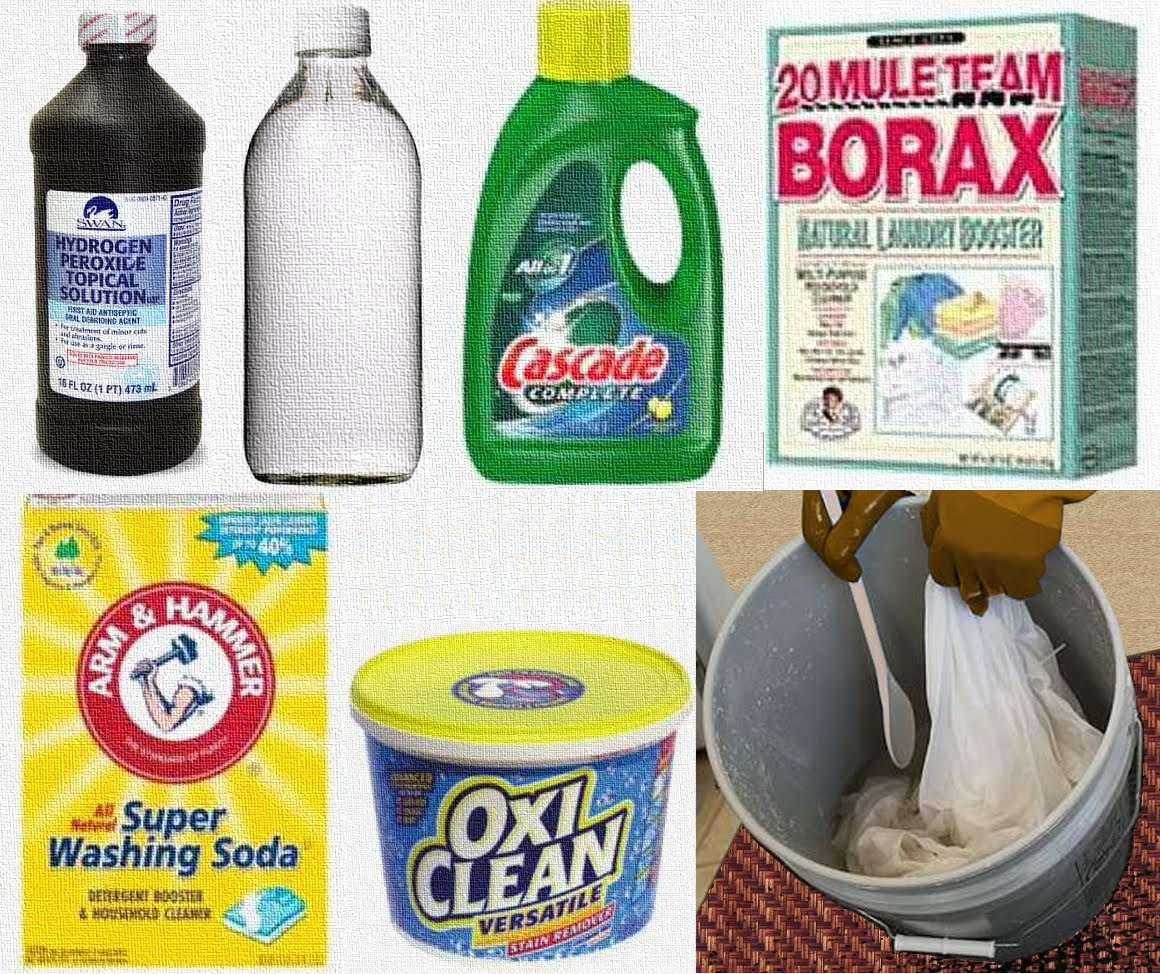 My family has elevated sweaty grimy greasy stains to an art form! This, combined with a limited budget for replacing clothing, has motivated me to find an all in one stain removing system that is easy and effective. I’ve used this recipe on jeans, brightly colored clothing and whites. I’ve not used it on many delicate fabrics, but if the garment was unusable because of an unsightly stain, I would give it a try. On the occasion that a stain is so firmly set that it will not be removed, I either dye it a darker color or send it to the scrap bin.


 Consider using a sock that has a contrasting color to your darning egg. It will make it easier to see your thread.


