headerphoto
Showing posts with label homemaking. Show all posts

The DaVinci Road -- Blazing a Trail for Learning

Bookmark and Share
Rebekah Anast brings her unique perspective to her newest book, The DaVinci Road. I half-expected to find tales of her jungle adventures, fun childhood, devotional gems, poetry or parenting tips. By the time I reluctantly turned the last page, I had not been disappointed. All of this and more are contained in The DaVinci Road.

The DaVinci Road expounds upon the learning method of observation to arrive at a conclusion. The author reflects upon her varied experiences and brings them into the classroom setting and beyond. Using DaVinci as her model, she encourages others to look and see the evidence for themselves. She urges all of us to continue to seek, to chase after the truth and to not grow complacent in that endeavor.

Her observations about life, children and academic instruction are sprinkled throughout along with some of her favorite recipes. She shares methods that have worked for her and others when dealing with a learning difficulty. The reader is left with a challenge to pursue the adventure that is this life with both eyes and ears wide open.

If you are interested in receiving a free ebook, here's the author and her husband with details on how this can be done.


NOTE: If you've got a computer and an Amazon account, you can use their Kindle application free. In other words you don't need a smartphone or some other personal electronic device (other than your computer) to read the book online. Here's the link for Kindle https://kindle.amazon.com/
read more “ The DaVinci Road -- Blazing a Trail for Learning ”

Self-reliance Recession-proof Your Pantry

Bookmark and Share
Complex food preservation instructions can be overwhelming. That's why I think Self-reliance Recession-Proof Your Pantry is wonderful. At less than 140 pages, it is precise and concise without wasting lots of ink. Jackie Clay is a prolific writer with Backwoods Home Magazine. Jeffrey Yugo, Sylvia Gist and Linda Gabris join Jackie in offering their words of wisdom on this topic.

One of the things I like most about this reference tool is that you needn't be planning to build a bomb shelter to implement these methods. Use as much as you'd like to stretch your own food budget. Whether you are wanting to set aside some overflow from the garden or if you are looking for a way to cut grocery expenses, you can use these methods to create an economic cushion and stretch your hard-earned dollar.

Learn the mechanics of rotating your storage, what you need for successful storage, how to can and what to can. A section in the book is also devoted to drying, smoking and pickling your foods. You'll learn what tools you need and what methods work best for people that have plenty of experience.

Jackie Clay has weathered the seasons and dealt with the challenges that have arisen as she has worked to make her 120-acre homestead successful. I get tired just reading about all that she has done! I've never been tempted to encourage her to slow down . . . I'd likely have to climb a ladder to chase her down. It wouldn't surprise me if she handed me chores to do while we talked!

If you're interested in reading a sample of Jackie's work, here's an article by her that you might find interesting: Jackie's Tips for Hard Core Homesteading


ABOUT BACK WOODS HOME MAGAZINE

Our family subscribes to Backwoods Home Magazine, and we enjoy it very much. They leave room in their editorials for divergent opinions. Occasionally, I find myself on opposite sides of an issue. However, Backwoods Home consistently offers valuable information for anyone looking for ways to become more self-sufficient and avoid being at the mercy of fluctuating markets. Having a subscription is like purchasing a tuition to a varied seminar delivered right to your home. For our family, it's money well spent.


read more “ Self-reliance Recession-proof Your Pantry ”

STOCKING UP ON SAVINGS -- ARE COUPONS WORTH THE EFFORT?

Bookmark and Share
Keeping a well stocked pantry, medicine cabinet and a good supply of various household items on hand has long been recommended by various preparedness and survival experts. This strategy, however, can also be used to help save money and insulate your household from fluctuating prices.

The biggest hurdle that families on limited incomes have is that there just isn't that much disposable income with which to accumulate a stockpile of items. When you are thinking about getting the funds to acquire the tools to preserve and store food items -- and the foods also -- it can seem like an impossible task.

Instead of trying to do everything at once, I recommend you break it down into three gradual steps.

STEP ONE: Create a 'Buy Price List.'

This is a two-step process that involves writing down each item you purchase, the size and the price. If you are using paper, use a separate sheet for each major category. I use the following categories: Baking, Beverages, Bread, Canned Goods, Cleaning, Clothing, Condiments, Dairy, Dental, Grain/Dry Beans, Hair Care, Household Items (batteries, etc.), Kitchen Tools, Meat, Medicine/Supplements, Paper, Personal Care/First Aid, Pets, Produce, School & Office, Seasonings and Snacks.

There will be duplicate entries because you'll keep this up for about two to three months. Eventually, you will notice that there are times when you get a better price than others. On a separate sheet of paper, you'll write down each item you normally purchase and the best price or the 'Buy Price' for that item. An example would look like this:
Household Items -- Batteries -- AA Alkaline Batteries -- $.37 each -- $5.99 for pack of 16

This is important because your 'Buy Price List' tells you when prices have dropped to the best price for your area. When prices hit the range on your list, purchase enough to last you for 6 weeks or so. Why six weeks? Because retail stores have sales cycles that range from 6 to 8 weeks. You'll have enough of an item in your home to hold you over until it goes on sale again. This means that the same products you already purchase will (eventually) only be purchased by you when you see the price drop.


There are online sites that offer guidelines on what is considered the lowest price, but these seldom take into account things like organic vegetables and/or the ingredients that you might use if you make things from scratch. You'll want to make your own list in order to know when something like your favorite bulk herb or Bragg Apple Cider Vinegar is available for a good price.

Step Two: Combine your buy price with coupons.

I know. Food coupons often promote processed foods and less than healthy options. However, consider for a moment how many items come home in your shopping bag that aren't actually foods. You probably purchase clothing, hair products and accessories, toothbrushes, batteries, canning jars, storage bags, garbage bags, paper products, etc. By combining manufacturer coupons with sales prices, you can greatly reduce the cost of these items, leaving more money for the healthy foods you prefer.

Many stores offer store coupons in their sales fliers and on their web sites. These can be printed off at home and redeemed in the store. Most stores will allow you to use a store coupon AND a manufacturer coupon for the purchase of single item. My husband was able to use this strategy to purchase two loaves of sprouted grain bread. The store coupon and the manufacturer coupon actually totaled more than the cost of the bread. He went through the checkout and got paid to leave with some very healthy bread.


Step 3: Leverage your savings

Now that each dollar is being used to get products at lower prices, and you are stocking up on the items you regularly use, you should notice a drop in your spending. This can take a few months to kick in, but it will happen. Once this occurs, you'll have a little nest egg. Use that as seed money to invest in tools to increase your savings. Whether it's as small as a well-organized coupon book, or as large as a durable wheat grinder, tools like these pay for themselves.
Maybe you've been thinking about raising your own eggs with some backyard chickens, or you'd like to find a rock bottom price for some bulk grains, or you need to build a sturdy pantry -- whatever your needs, consider purchasing something that increases your ability to be self-sustaining and thereby further stretches your dollar.

Your savings will also allow you to collect items that would be a blessing to a family in need. Imagine how a basket of toiletries and cleaning products would be received by a family that had just lost their home. What you were able to collect for free (or nearly free) could be a great bounty to them.

If you are interested in learning more about how to effectively coupon, here are some resources I recommend:
read more “ STOCKING UP ON SAVINGS -- ARE COUPONS WORTH THE EFFORT? ”

SOME SAVING STRATEGIES

Bookmark and Share
Getting quality ingredients that are packed with nutrition has become increasingly difficult on a tight budget. Finding someone to tell you how to keep expenses down can become even more confusing because every family has different needs and there are TONS of methods for saving on groceries.

So, what I will share in this article are a few things that work for me. These are not hard fast rules. I will not send the Learn and Live Well police to your home to check for violations. These are simply guidelines that I use which have proved helpful. Hopefully, there is enough here to help you get the most for your money.

Become a Low Price Expert
Your family's grocery shopper may not have a lot of influence over the household and food budget. Regardless of your circumstances, you can make yourself a student of pricing in your area. Knowing how much an item costs -- what is actually a good price and what isn't -- will make you a smart shopper. If you've only got $5 to spend, you may as well get the most out of your limited budget. One way to do this is to start a price comparison notebook. Give a separate page for each item you regularly purchase. Include cleaning products, snacks, toiletries and food. You can use your receipts, sales fliers or just walk the aisles of your favorite store and record the size and price of each item, along with brand name and a short description. Once you know what's a good price for an item, you can watch the notices for sales and make purchases when you see the price fall to that level.


Use Basic Ingredients
Another way to save money is to stop purchasing convenience items. Processed foods don't just compromise your health, they lower your bank balance. Learning how to organize your kitchen and cook from scratch isn't too overwhelming if you just begin with one thing at a time. Mastering one dish will encourage you to attempt more ambitious things. For instance, knowing how to make bread can lead to grinding your own grain which can lead to learning how to make your own tortillas and pasta . . . . all of which will be more nutritious and less costly than the name brand item you are purchasing now. I can get organic brown rice cheaper than the regular off the shelf version by knowing how to find it cheap, store it and prepare it.

Of course, this will change the items you purchase and your price comparison notebook will reflect the change. Instead of the best price on glass and surface cleaner, you'll want to know the best price on vinegar and baking soda. The good news is that you'll automatically be spending less by purchasing the ingredients AND you'll save more on top of this by finding the best price on those ingredients.

Invest in Local Farmers
It's one thing to tell everyone they should be eating farm fresh produce, but it's quite another to find a way to accomplish it in practice. Unless you have years of farming experience and plenty of acreage outside of a residential area, you may find the task a daunting one. Not everyone has the vision and abilities that Jules Dervaes has demonstrated by turning his little city lot into a working farmstead. (Check out the Dervaes' story on www.urbanhomestead.org you might be inspired to plant a tomato or two.)

Instead, you can do the next best thing. Consider purchasing shares in a local farm. Find farmers near you that are willing to allow you to invest in their farm. These are called CSA's which stands for Consumer Supported Agriculture. Using the web site www.localharvest.org we were able to find a farmer near us that had a good reputation and a wide variety of produce. After touring his farm (and meeting his lovely family), we agreed on a price and purchased shares in all three 7-week growing seasons in our area. In addition, we were able to make arrangements to purchase some beef in advance of processing. This required some up-front money, but it also insured that we would have weekly baskets of fresh produce and a freezer full of beef without a hint of pink slime. *blech!*

Purchase Bulk Dry Goods
Organic staples like dried beans, brown rice, wheat berries, grits, corn meal, etc. can be difficult to find at good prices. One way to make sure you have them on hand is to purchase them in bulk. These are often found in 25 pound bags or larger. The dry goods can be kept in a large freezer or at controlled room temperature in pest-proof containers. I've found that placing a bay leaf in containers keeps them weevil and bug free as well as placing them in wide-mouthed canning jars that I vacuum seal using a FoodSaver Vacuum Sealer using a Wide-Mouth Jar Sealer attachment. Combining this with a well built shelving unit has freed up my freezer space (for the beef I purchased from our CSA *smiles*).

Combine Coupons With Sales on Items You Use
There are a lot of web sites out there which tell you how to accomplish this. In fact, by making so many things from scratch you will already be beating most couponers in the low price game. However, when it comes to ANYTHING you buy off the rack -- from tires to toilet paper -- you can save some MAJOR money using coupons. One store near me sells organic canned vegetables for more than $1 per can. I wait until those same items go on sale for $.60 and then load up my cart with enough to keep the pantry full until the sale hits again. I use my customer loyalty card that gives me an additional discount on certain days and saves me money when my husband gets gas for the vehicles. For more discussion on whether coupons are worth your time, check our this post: STOCKING UP ON SAVINGS -- ARE COUPONS WORTH THE EFFORT?

Here are my three favorite sites for information on how to save money with coupons.

Southern Saver -- I like this site for practical strategies and information for beginners. She includes a lot of in-store videos that demonstrate her methods. She also gives workshops. Check her calendar.

Krazy Coupon Lady -- This site helps those who already use coupons increase their savings with various strategies. They also have a really good book available on the subject called: Pick Another Checkout Lane, Honey: Save Big Money & Make the Grocery Aisle your Catwalk!

Coupon Mom -- This site includes a very handy searchable database to investigate the sales in your area and tell you where to find coupons.

Check out the coupon helps section of Morrison's Mercantile.
read more “ SOME SAVING STRATEGIES ”

HOW TO CREATE EXTRA STORAGE

Bookmark and Share
There are many techniques to finding the space to store needed items. Whether you are just downsizing or struggling to create a pantry in a house with no closets, here are a few ways to find a place to put your stuff.

USE SPACE BENEATH FURNITURE
Skirted Storage
A skirted table can hide a myriad of things in almost any room of your house. Secure a plywood top over a base such as a small bookcase, low filing cabinet or an upside down trash container. Drape a decorative cloth over the board that is long enough to reach the floor. Beneath the skirt there is storage space for books, boxes, craft supplies, television, etc.

Beds, Tables, Chairs
Storage can be created using plastic boxes or baskets. Place baskets under tables and in open cabinets for miscellaneous storage. These are great for shoes, out-of-season items, sports equipment, etc. Place a label on the end of the box, listing the contents. If your bed is too low, it can be made higher by "building" taller legs with plumbing pipes or ready-made bed risers.

REPURPOSE ITEMS
Doors
Storage can be found on the back of every door. Hanging shoe bags, shelves, or racks can be used for everything from toiletries, to office supplies.

Closets
Two-drawer filing cabinets easily fit into most closets, and the top can be used as a shelf. The space remaining above can be used to hang short clothing.

Lidded Furnishings
Choose a bench with a hinged lid for the end of a bed, under a window, or table seating. Lidded cubed ottomans can also provide extra storage as can a chest used in place of a coffee table. Use the space to store blankets, sheets, dishes, linens, out-of-season items, or toys.

REPURPOSE SPACE
Look Up
Few people utilize space higher than 5 feet. Consider installing shelves 12" to 18" below the ceiling. Mount shelves above the windows of the room. Use this to display things you don't use regularly but love to look at such as plants, hats, or photos. Use museum wax to anchor your collectibles in place.

Hooks
Hooks mounted on walls can be used to hold buckets and bags for everything from laundry to tools and toys.

Shelves
Make sure your shelves are spaced properly. If all the shelves are arranged at 18" but stored items are 8" high, you're missing out on about 10" of storage space. Reorganize this by adding shelf supports and new shelves.

Halls
Install shelves or hooks along one side of a wide hallway or above door height. If you have space at the end of the hall, use it to house a small desk and chair. Add shelves above the desk for supplies or books.

Unused Corners
Corner cabinets and shelves are great for unused space such as on a stair landing. A corner can also house a file cabinet. Since most file cabinets are also metal, take advantage of strong magnetic holders and hooks for storage on the exposed sides.

Beneath Stairs
An assortment of wooden nooks, hooks, cubbies, drawers and shelves can be custom fitted to suit your needs. This can be finished with cabinet doors or curtains.

Between Wall Studs
Shallow recessed shelving can be created between wall studs. In most homes, studs are spaced 16 inches apart. These shelves average about 3 ½ inches deep.


Here are included a couple of short videos with additional tips on finding ways to create storage with limited space.


read more “ HOW TO CREATE EXTRA STORAGE ”

EASY BATHROOM CLEANUP TIPS

Bookmark and Share
When you don’t have time to wash a tile floor, baking soda is a quick, easy, non-abrasive floor cleaner and polisher. A homemade scouring powder made with a mixture of baking soda and Borax is also a good choice with the additional benefit that it discourages bugs.

Sprinkle baking soda onto the tile and grout lines. Push it with your broom into corners and crevices. Sweep the soda into your dust bin. Toss the soiled baking soda into the bathroom wastebasket where it will continue to help fight bathroom odors.

The baking soda will turn dark with the debris it picks up. This even works well on dried on stains and bits of hair. The baking soda clings to all of it and dries even oily residues so that they can be swept away. If you’re tired of reaching around the base of bathroom fixtures to get hard-to-reach areas, this makes things much easier.

One of my readers was dealing with stubborn black stains in the grout lines of her bathtub wall tiles.

Those stubborn stains are most often caused by mold, mildew and hard water. Baking soda addresses all of these issues as it is a water softener and it releases carbon dioxide from the surface, killing organisms that thrive in an anaerobic (without oxygen) environment.

Make a paste with baking soda and water. Apply the paste to the grout with an old toothbrush. For really stubborn areas, make the paste with hydrogen peroxide and baking soda. Let it sit for a while. Come back later and rub the toothbrush over the area and rinse it clean. An effective rinse is to mix vinegar and water. The acid in the vinegar further activates the sodium bicarbonate in the baking soda. Wipe the surface dry with a soft cloth.

The vinegar and water also adjusts the pH to a level that discourages mold and mildew from reforming. You can use this as a general surface spray between showers and baths.

Another help is to keep the tub and shower areas free of soap, toiletry bottles, washrags, towels and other items. Store these outside of the tub/shower area. The soap residue provides a place for mold and mildew to grow. The bottles and their storage racks hold water against walls and horizontal surfaces. With these removed, you’ll be better able to hit all of the nooks and crannies when you spray the shower/tub area with your diluted vinegar.

For convenience, use small plastic crates to hold needed supplies. Assign a storage area on a nearby shelf. Then, when someone uses the shower, he/she can just bring along the toiletry box and contents, rather than trying to manage an armload of assorted products.
read more “ EASY BATHROOM CLEANUP TIPS ”

HOW TO MAKE WHEY

Bookmark and Share
Whey is a valuable addition to any diet. It can be an added ingredient to enhance many sauces, foods and beverages. It is also a key ingredient in lacto-fermented foods.

A quick internet search will reveal that many people cover their jars with cloth or a coffee filter when making whey. I don’t. The reason I don’t do this is because I am not trying to capture bacteria from the environment. Raw milk comes perfectly packaged with the right blend of digestive enzymes and bacteria needed to cause separation to occur. You needn’t expose it to the elements for this to happen. As a matter of fact, if you left raw milk in your refrigerator long enough, separation into curds and whey would eventually occur within the sealed container at cooler temperatures. Leaving it on your countertop simply places the milk at temperatures where this happens sooner.

To make whey, pour raw milk into a clean glass quart jar. Cover the jar with a plastic lid (or coffee filter, or clean cotton cloth) and allow it to sit undisturbed for 2-3 days until separation occurs. You will know the milk has separated when you see white solids floating in a yellowish clear liquid. The liquid is whey. The white solid is cream cheese – also known as curds.

Line a strainer with an unbleached coffee filter or clean cotton cloth (such as a freshly laundered t-shirt).

Pour the liquid and solids into the strainer, catching the liquid in a glass bowl. When the dripping stops, transfer the whey into a lidded jar labeled with the date. The whey will keep in your refrigerator for about 6 months.

The cream cheese can be seasoned to suit your taste and used in your favorite recipes.

If you have yogurt, the yellow or clear liquid that floats to the top is whey. You can pour this off and use it in food preservation.
read more “ HOW TO MAKE WHEY ”

STAIN REMOVAL & WHITENING SOAK

Bookmark and Share
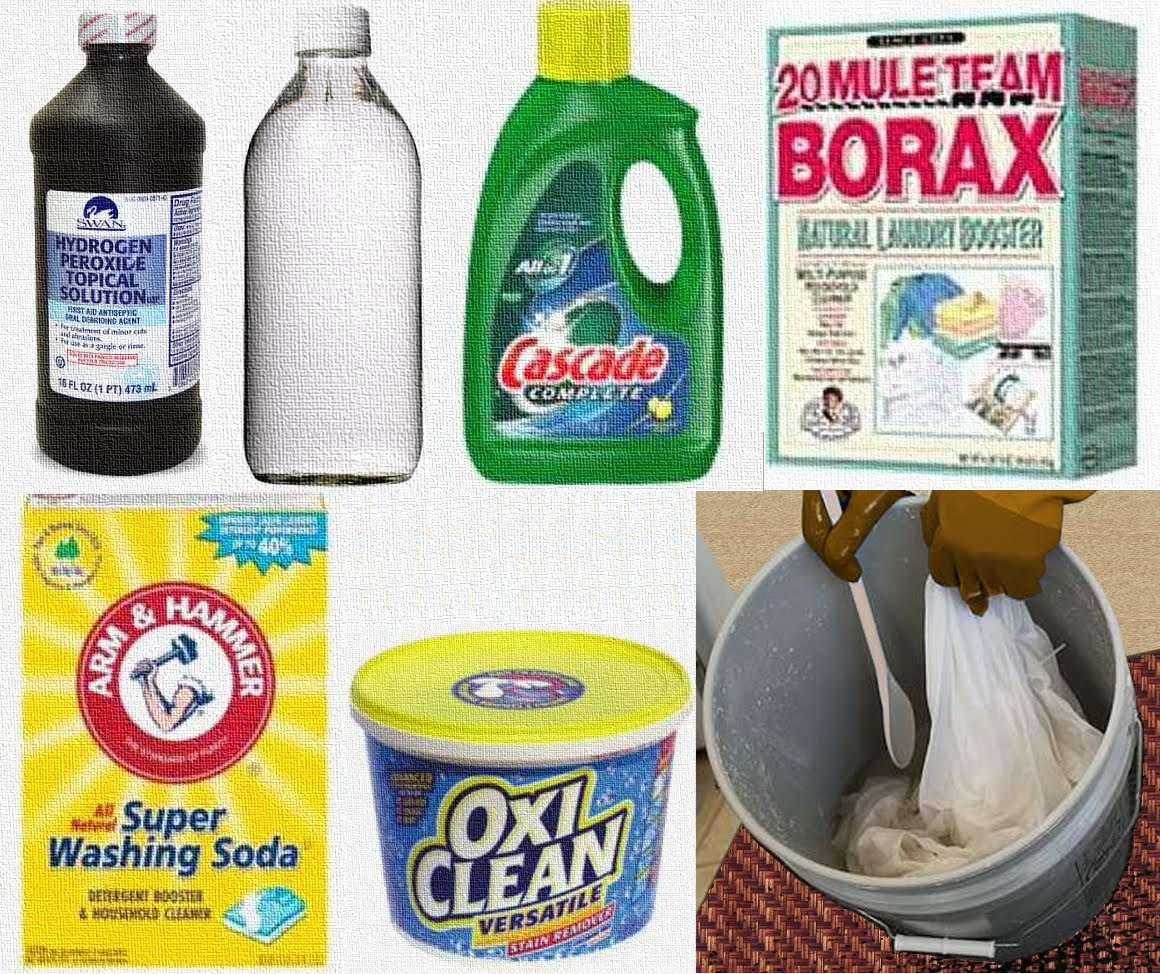
My family has elevated sweaty grimy greasy stains to an art form! This, combined with a limited budget for replacing clothing, has motivated me to find an all in one stain removing system that is easy and effective. I’ve used this recipe on jeans, brightly colored clothing and whites. I’ve not used it on many delicate fabrics, but if the garment was unusable because of an unsightly stain, I would give it a try. On the occasion that a stain is so firmly set that it will not be removed, I either dye it a darker color or send it to the scrap bin.

You will need two 5-gallon buckets with lids.

Combine the Following:
°2 cups borax
°2 cups washing soda
°1 cup OxiClean®
°1 cup Cascade Complete All-in-1 Gel
°1 cup hydrogen peroxide
°2 cups vinegar
°1 to 2 gallons of HOT water

Gradually add 1 to 2 gallons of HOT water while stirring the mixture. Be sure to stir well or the powder will clump into hard lumps. If this happens, you should be able to smash the clumps against the side of the bucket with a wooden spoon. Place the garments you wish to soak into a separate 5 gallon bucket. If I have a lot of items, I sometimes use 2 buckets, one for whites and another for colors. Pour the liquid over the fabric in the bucket. If using 2 buckets, equally divide the solution among them. Add more hot water so that the fabrics are immersed. Cover the bucket and allow it to soak overnight.

The next morning, dump the contents of the bucket into your washing machine (or wash tub) and send them through a rinse and spin cycle. Then, wash the clothes as you would normally. This works great for socks, dingy undershirts and linens. It would even be a good tool to use on yard sale finds.

This formula has evolved over time. Feel free to adjust it to suit your own needs.
read more “ STAIN REMOVAL & WHITENING SOAK ”

BEGINNING A SOURDOUGH STARTER

Bookmark and Share
Place 6 tablespoons of ground, whole grain flour into a wide-mouthed glass container and mix this well with 4 tablespoons of water. Filtered water is recommended as chlorinated water from the tap will be harmful to the bacteria you are trying to culture. Stir this to make sure the water and flour are well-incorporated, scraping any residue down off of the sides of the container. Secure a cover on the jar loosely. This will keep out unwanted pests and protect the new starter from drying. A loosely fitting lid also allows gases (which result as the cultures multiply) to escape without breaking your container.

GIVE IT A GROWING START
Allow your new starter to sit for 12 hours and check it to see whether there are any bubbles by looking at the side of the glass. If you don’t see any bubbles, stir the starter vigorously and re-cover it loosely. Check it again in 12 hours. The presence of bubbles will tell you that there are enough organisms growing to thrive in your starter. Feeding the starter before you see bubbles could dilute the strength of your starter by separating the organisms that need each other to thrive. This happens more commonly in cooler climates

If you still aren’t seeing bubbles after two days, discard the starter and begin again with bottled spring water and a different brand of whole wheat flour.

FEEDING AND MAINTENANCE
When your starter begins to make bubbles, it will be ready for regular feedings. A feeding consists of 6 tablespoons of flour and 4 tablespoons of water. Feedings should take place every 12 hours. I feed mine each morning and evening. The starter should double itself a few hours after being fed. Place a rubber band around your glass jar to mark the level of your starter. This way, you can see how much it rises and how long it takes the starter to double. The rising time of your starter is a good indicator of how much time you will need to allow your dough to rise.

A well-fed, healthy starter will have a stable colony of microbes that will produce enough carbon dioxide to cause your dough to rise nicely. Just as you would with a garden, the key to having a healthy Sourdough starter is to give it a good environment in which to grow. In the absence of proper food, yeast and the lactobacilli will die, leaving your starter to be taken over by bad bacteria that thrive on decay. This is something that definitely WON’T enhance your bread!

When the quantity of your starter reaches 2 cups, discard half of it at each feeding. This provides the starter enough room to continue growing and keeps it from becoming too large to manage. If you wish to bake a large batch of bread at one time, you can continue feeding the starter without discarding any until you have the necessary amount. Just be sure to stir the starter vigorously at each feeding. This shuffles the microbes and allows them to access more food. They don’t have the ability to migrate to better food sources on their own.

Your new starter will be ready to make bread when it accomplishes two things. The starter should be at least 4 days old as this is the length of time required to produce an established colony of microbes. Your culture should produce bubbles and double in bulk between feedings.

If you find that your starter is not doing well, you can add a couple of tablespoons of Kefir to the mixture as a booster shot. The day before I bake a loaf of bread, I feed my starter three times: morning, noon and evening.

TIPS
If your glass container becomes coated, your starter can be poured into another clean jar. I place the food mixture in a clean measuring glass and stir vigorously. Then I add the contents of my starter jar to the food, blending the entire contents well. I clean and dry the (now empty) starter container, return the newly fed starter to the jar and replace the lid loosely.

If you find that you wish to take a break from baking or will be out of town, feed your starter and place it into the refrigerator. When you wish to use it again, remove your starter and feed it. Once you see bubbles, feed it 3 times in one day. After this, it should be ready to use again.

SUBSTITUTING SOURDOUGH IN A RECIPE
The rising times for a recipe made with sourdough will be different than with commercial yeast. Remember to watch how your starter rises to determine the amount of time your converted recipe will require.

A cup of healthy Sourdough starter should equal one package (2 ¼ tsp) of yeast in its ability to rise. To convert a recipe, reduce the amount of liquid by ½ cup and reduce the flour by ¾ cup for each package of yeast you replace with a cup of sourdough starter. You may have to adjust the amount of water and flour to get the proper consistency to your dough.
read more “ BEGINNING A SOURDOUGH STARTER ”

CAST IRON BUILDUP REMOVAL

Bookmark and Share
Cast iron cookware can become encumbered with gunk and rust. Thankfully, cast iron is very forgiving and with a little time can be stripped and refinished to its former glory. The method for removal is simple. The stripped metal gives you a good starting point to re-season your pan with a no-stick finish.

GET AS MUCH OFF AS YOU CAN BEFORE STRIPPINGpan in oven
Use hot water and vinegar to rinse after using salt and baking soda to clean as much of the debris off of your pan as possible. Dry the pan and place it into your oven, face down. You may want to line the bottom shelf with foil to catch drips. Set the temperature to 500 degrees, open a window and turn on an exhaust fan. Leave it baking for 1 hour, turn off the oven and allow the pan to cool inside your oven. This helps melt the excess grease off of your pan by taking it beyond its smoke point.

I include this step because if you have pans with a LOT of buildup, you will want to reduce the amount of oil left on the pans before you actually strip them down. In cooking applications, you wouldn’t want to heat oil past its smoke point because that releases free radicals (which are carcinogens). However, to get the oil off your pans, you will need to do this. Keep the room WELL ventilated.

Technically, this step could be skipped, but pans that have a thick layer of grease could catch fire. I recommend reducing the buildup first in order to decrease the likelihood of a grease fire BEFORE you subject the pan to the heat of a self-cleaning cycle -- during which the oven door will be automatically locked.

When the pan has cooled, remove it, wash and dry.

STRIPPING YOUR COOKWARE
Self-cleaning ovens are a convenient tool with which to strip your cast iron because they heat to approximately 900 degrees Fahrenheit (482 degrees Celsius). Such high temperature cycles burn off all food and oil debris. A safety feature keeps the oven door locked and closed during and immediately after the high-temperature cleaning cycle, which lasts approximately three hours, to prevent possible burn injuries. Usually, the door can be opened after the temperature cools to approximately 600 °F (300 °C).

You could actually skip the 500 degree baking and go straight to the self-cleaning step, but pans that have a thick layer of grease could catch fire. I recommend reducing the buildup as much as possible BEFORE you subject the pan to the self-cleaning cycle.

Many people leave their wire racks in the oven for this step, but it will strip and blacken your racks. Additionally, the consumer handbooks recommend removing the wire racks when using the self-cleaning cycle. I’ve found an alternative. Ceramic coffee mugs have already been kiln fired and can easily withstand the high temperatures. Simply position old mugs around the wire heating elements and perch the cast iron on top of them. Don’t use old bricks or stones, as these haven’t been glazed and may have water trapped inside, which would cause them to explode in the hot oven.

Keep the room well ventilated using an exhaust fan and an open window or door.

A RUSTIC ALTERNATIVE
If you don’t have a self-cleaning oven and have access to a fire pit, there is another alternative. Build a hot fire with hard wood. Soft, resinous woods will leave a blackened film on your pans. Once your fire is roaring hot, put your pan in the hot coals of the fire. Keep feeding the flame for a couple of hours. Allow it to die down and cool naturally. Remove your pan and scrub it clean.

RUST
You may find that there is a film of rust remaining on your cast iron. If this is the case, scrub this clear with coarse salt and baking soda. Rinse with hot water and dry carefully.


Follow safety precautions when working with heated metals, kitchen appliances and/or fire. This article is for information purposes only. The reader assumes all liability when utilizing these methods.
read more “ CAST IRON BUILDUP REMOVAL ”

HOMEMADE DISHWASHER POWDER

Bookmark and Share
There are a LOT of recipes for dishwashing soap. I don’t claim to have the best recipe, but I will share what works for me.

WHY NOT USE SOAP?
For dishwashers, you need cleaning power, not soapy suds. If you were to place regular soap flakes into a dishwashing machine, your kitchen floor would soon be filled with lots of bubbles. For a dishwasher, the detergent needs to break down grease, disinfect and rinse clean without leaving soap spots.

ESSENTIAL OILS?
I don’t use essential oils in my dishwasher powder. Very hot conditions will neutralize the scent of an essential oil. Good quality essential oils are pricey, so I prefer to use them in applications where they won’t be diminished. Feel free to add essential oil if that is your preference.

KAY’S DISHWASHER POWDER:
Mix together 2 cups Borax, 2 cups Baking Soda, ½ Cup salt and 1 cup citric acid.
This makes enough powder to just fit inside a quart sized zippered freezer bag. I place this inside a larger gallon sized zippered bag. This is to seal moisture out. The citric acid and baking soda will absorb moisture from the air and clump if the bag is not sealed. I use a DRY kitchen spoon to place a couple of tablespoons of powder in my machine per load. Using this, I’ve never had to use any spot-free solutions for the rinse/drying cycle.

This powder can also be used to wash dishes by hand. Vinegar in your rinse water is helpful for containers that have greasy residue.

A HANDY TIP:
I keep a soap dish next to my kitchen sink. The bottom of this dish has drainage holes. I place a sponge beneath these holes so that when the bar soap is used, it drains onto the sponge. If I need to spot clean a dish or a soiled surface, I simply moisten this sponge and use it.


This article is for information purposes only. Utilize these methods at your own risk and using your own discretion.
read more “ HOMEMADE DISHWASHER POWDER ”

SCOURING POWDER & SPRAY CLEANERS

Bookmark and Share
Grandma managed to keep her home clean long before there was an aisle in the grocery store devoted to perfumed products that promised to make her job easier. Dependence on retail cleaners can leave you wondering if you aren’t spending WAY too much on the latest chemical goo.

The good news is that you can keep more of your hard-earned money AND get your house clean without lots of toxic chemicals. Here are four simple products that you can make to clean several areas of your home.

SCOURING POWDER
This is a nice, non-abrasive cleaner that can be used by applying it to a wet sponge and rubbing in a circular motion. You can use Baking Soda alone, but for extra water softening and germ-fighting I use 1 part Borax, 2 parts Baking Soda and ½ part salt. This will take care of some stubborn stains without scratching delicate surfaces. I keep mine in a wide-mouthed container with shaker holes beneath a closeable lid.

ALL PURPOSE SPRAY/RINSE
Used as a rinse for the homemade scouring powder, this will create a foaming action. Mix white vinegar and water in equal parts. Place your solution in a pistol-grip sprayer. Spray surfaces you’ve used the scouring powder on, wipe with a damp sponge and rinse. It leaves a gleaming shine. The vinegar cuts the grease and also has anti-bacterial properties. By itself, this is also useful to wipe down tables, counter tops and clean glass and windows. If you use this as an after shower/bath spray it will also discourage mold on your grout.

HARD SURFACE, GLASS & DISINFECTANT/CLEANER
Mix 1 part rubbing alcohol with 1 part water. For every 2 cups of solution, add 3 tablespoons of white vinegar. Place into a spray container and use to clean hard surfaces that you want germ and streak-free. I like to use this to wipe down metal surfaces as it quickly dries without leaving spots. I also like to use it on light switches, doorknobs, and other surfaces that have a multitude of little hands on them.

SOAP SCUM & MOLD TREATMENT
Hard water causes soap to cling to surfaces in the shower and tub. This can lead to a problem with mold. A spray-on treatment for this is to use one part Hydrogen Peroxide and two parts water. Place it into a spray bottle and spray onto the surface. Let it sit for an hour and then clean with scouring powder.


This article is for information purposes only. Utilize these methods at your own risk and using your own discretion.
read more “ SCOURING POWDER & SPRAY CLEANERS ”

PARENTAL PREPAREDNESS

Bookmark and Share
Parents want to protect their children when surprising circumstances arise. Being prepared helps whether the electricity is out or you’ve been stranded unexpectedly.

PREPARED, NOT PANICKED
The temptation to panic is dangerous when in an emergency (reference: RULE OF 3'S TO SURVIVE). Young ones will mirror your feelings. Your efforts to be prepared will give you the confidence you need to reassure your children.

RELEVANCE OF ROUTINE
Look for creative ways to implement a daily routine for the sake of your children. This is comforting and offers a sense of stability from the parent to the child.

PASTIMES
Amusements help pass the time when you are unable to travel. It is unlikely that you will have access to a source of power to operate electronic games. Craft supplies are wonderful to have on hand; this includes play dough, scissors, paper, tape, markers, glue and other assorted items. Take the time to introduce your children to board games, dolls, toy cars, blocks, puzzles and reading in order that they will be welcomed ‘old friends’ should they need entertainment. It is also wise to keep educational materials stocked (items such as work books, flash cards, pencils, reference books, etc.) in the event you find organized schooling is no longer an option.

HEALTHY ON PURPOSE
While access to remedies and treatments are available, utilize them to maintain your dental and overall health. It is far better to meet unexpected events with well-maintained health rather than ailments worsened by neglect. Stock any medicines required by your family members. Get into the habit of observing the sleeping, eating and toilet patterns of your family members so that you will detect illness early and be able to deal with it proactively. Train yourself to be observant of the impact circumstances are having on your loved ones. Otherwise, it will be easy to remain focused on your own challenges to the exclusion of others.

AVOID FAKE FOODS
The foods you consume today will affect your health tomorrow. Without proper training children could refuse to consume proper amounts of nutritious foods. Taste buds can be trained to appreciate a variety of tastes and textures available in real foods, but this can be difficult if the pallet has been compromised with processed foods and sugars. Take time to introduce new foods gradually in the diet. Learn about nutrition and basic food preparation -- and teach your children about these things also.

INFANTS & BABIES
A baby doesn’t require lots of gadgets for proper care. Just as yesterday’s mothers didn’t require music players, pacifiers, disposable diapers, bouncy seats, carriers, cribs and other accoutrements for infant care, neither are they necessities today. Babies need to be kept fed, clean, dry and warm.

Nursing an infant is a skill that can be learned. Breastfeeding is worth the time investment as it is beneficial to both mother and infant. This can help insure that the smallest family member has a ready supply of nourishment. For bottle-fed babies, you will need to keep formula in stock.

Infants require protection from extremes of cold and heat as their bodies aren’t yet able to regulate temperature. Babies need to be shielded from the summer sun. Umbrellas are useful for this application. Layering clothing in the winter will help protect little ones from the cold. Zippered fleece sleepers can be placed over long thermal underwear for nighttime warmth. Two or three persons sharing a single bed helps to retain warmth during the night. Wool socks, hats and zippered fleece jackets can keep babies warm during the day.

SANITATION
During cold temperatures or when water is scarce, there is no need to expect that baths will be a daily occurrence. Select the warmest area you can find and show children how to quickly wash their face, hands, genitals and feet each day. Become diligent about washing hands before meal preparation and before eating. This becomes even more important when conditions are primitive. Take the time to teach older children about latrine construction, placement and proper disposal of waste.

USEFUL ABILITIES
Learning life skills gives children more confidence in uncertain circumstances. Teaching your children how to shop, stock a pantry, pitch a tent, build a camp fire, sew, repair small engines, perform CPR, first aid, garden and swim is an investment. Understanding what to do during a fire drill, how to fend off an attack and having practiced other scenarios are real confidence builders. Prepared children aren’t as likely to fall apart emotionally.

When preparedness is made part of your daily living, your children will be better equipped to deal with emergencies. Rather than be fearful, your young ones will understand what is necessary to manage a crisis. Strengthen your family today with these measures.
read more “ PARENTAL PREPAREDNESS ”