headerphoto
Showing posts with label household products. Show all posts

HOW TO CREATE EXTRA STORAGE

Bookmark and Share
There are many techniques to finding the space to store needed items. Whether you are just downsizing or struggling to create a pantry in a house with no closets, here are a few ways to find a place to put your stuff.

USE SPACE BENEATH FURNITURE
Skirted Storage
A skirted table can hide a myriad of things in almost any room of your house. Secure a plywood top over a base such as a small bookcase, low filing cabinet or an upside down trash container. Drape a decorative cloth over the board that is long enough to reach the floor. Beneath the skirt there is storage space for books, boxes, craft supplies, television, etc.

Beds, Tables, Chairs
Storage can be created using plastic boxes or baskets. Place baskets under tables and in open cabinets for miscellaneous storage. These are great for shoes, out-of-season items, sports equipment, etc. Place a label on the end of the box, listing the contents. If your bed is too low, it can be made higher by "building" taller legs with plumbing pipes or ready-made bed risers.

REPURPOSE ITEMS
Doors
Storage can be found on the back of every door. Hanging shoe bags, shelves, or racks can be used for everything from toiletries, to office supplies.

Closets
Two-drawer filing cabinets easily fit into most closets, and the top can be used as a shelf. The space remaining above can be used to hang short clothing.

Lidded Furnishings
Choose a bench with a hinged lid for the end of a bed, under a window, or table seating. Lidded cubed ottomans can also provide extra storage as can a chest used in place of a coffee table. Use the space to store blankets, sheets, dishes, linens, out-of-season items, or toys.

REPURPOSE SPACE
Look Up
Few people utilize space higher than 5 feet. Consider installing shelves 12" to 18" below the ceiling. Mount shelves above the windows of the room. Use this to display things you don't use regularly but love to look at such as plants, hats, or photos. Use museum wax to anchor your collectibles in place.

Hooks
Hooks mounted on walls can be used to hold buckets and bags for everything from laundry to tools and toys.

Shelves
Make sure your shelves are spaced properly. If all the shelves are arranged at 18" but stored items are 8" high, you're missing out on about 10" of storage space. Reorganize this by adding shelf supports and new shelves.

Halls
Install shelves or hooks along one side of a wide hallway or above door height. If you have space at the end of the hall, use it to house a small desk and chair. Add shelves above the desk for supplies or books.

Unused Corners
Corner cabinets and shelves are great for unused space such as on a stair landing. A corner can also house a file cabinet. Since most file cabinets are also metal, take advantage of strong magnetic holders and hooks for storage on the exposed sides.

Beneath Stairs
An assortment of wooden nooks, hooks, cubbies, drawers and shelves can be custom fitted to suit your needs. This can be finished with cabinet doors or curtains.

Between Wall Studs
Shallow recessed shelving can be created between wall studs. In most homes, studs are spaced 16 inches apart. These shelves average about 3 ½ inches deep.


Here are included a couple of short videos with additional tips on finding ways to create storage with limited space.


read more “ HOW TO CREATE EXTRA STORAGE ”

EASY BATHROOM CLEANUP TIPS

Bookmark and Share
When you don’t have time to wash a tile floor, baking soda is a quick, easy, non-abrasive floor cleaner and polisher. A homemade scouring powder made with a mixture of baking soda and Borax is also a good choice with the additional benefit that it discourages bugs.

Sprinkle baking soda onto the tile and grout lines. Push it with your broom into corners and crevices. Sweep the soda into your dust bin. Toss the soiled baking soda into the bathroom wastebasket where it will continue to help fight bathroom odors.

The baking soda will turn dark with the debris it picks up. This even works well on dried on stains and bits of hair. The baking soda clings to all of it and dries even oily residues so that they can be swept away. If you’re tired of reaching around the base of bathroom fixtures to get hard-to-reach areas, this makes things much easier.

One of my readers was dealing with stubborn black stains in the grout lines of her bathtub wall tiles.

Those stubborn stains are most often caused by mold, mildew and hard water. Baking soda addresses all of these issues as it is a water softener and it releases carbon dioxide from the surface, killing organisms that thrive in an anaerobic (without oxygen) environment.

Make a paste with baking soda and water. Apply the paste to the grout with an old toothbrush. For really stubborn areas, make the paste with hydrogen peroxide and baking soda. Let it sit for a while. Come back later and rub the toothbrush over the area and rinse it clean. An effective rinse is to mix vinegar and water. The acid in the vinegar further activates the sodium bicarbonate in the baking soda. Wipe the surface dry with a soft cloth.

The vinegar and water also adjusts the pH to a level that discourages mold and mildew from reforming. You can use this as a general surface spray between showers and baths.

Another help is to keep the tub and shower areas free of soap, toiletry bottles, washrags, towels and other items. Store these outside of the tub/shower area. The soap residue provides a place for mold and mildew to grow. The bottles and their storage racks hold water against walls and horizontal surfaces. With these removed, you’ll be better able to hit all of the nooks and crannies when you spray the shower/tub area with your diluted vinegar.

For convenience, use small plastic crates to hold needed supplies. Assign a storage area on a nearby shelf. Then, when someone uses the shower, he/she can just bring along the toiletry box and contents, rather than trying to manage an armload of assorted products.
read more “ EASY BATHROOM CLEANUP TIPS ”

STAIN REMOVAL & WHITENING SOAK

Bookmark and Share
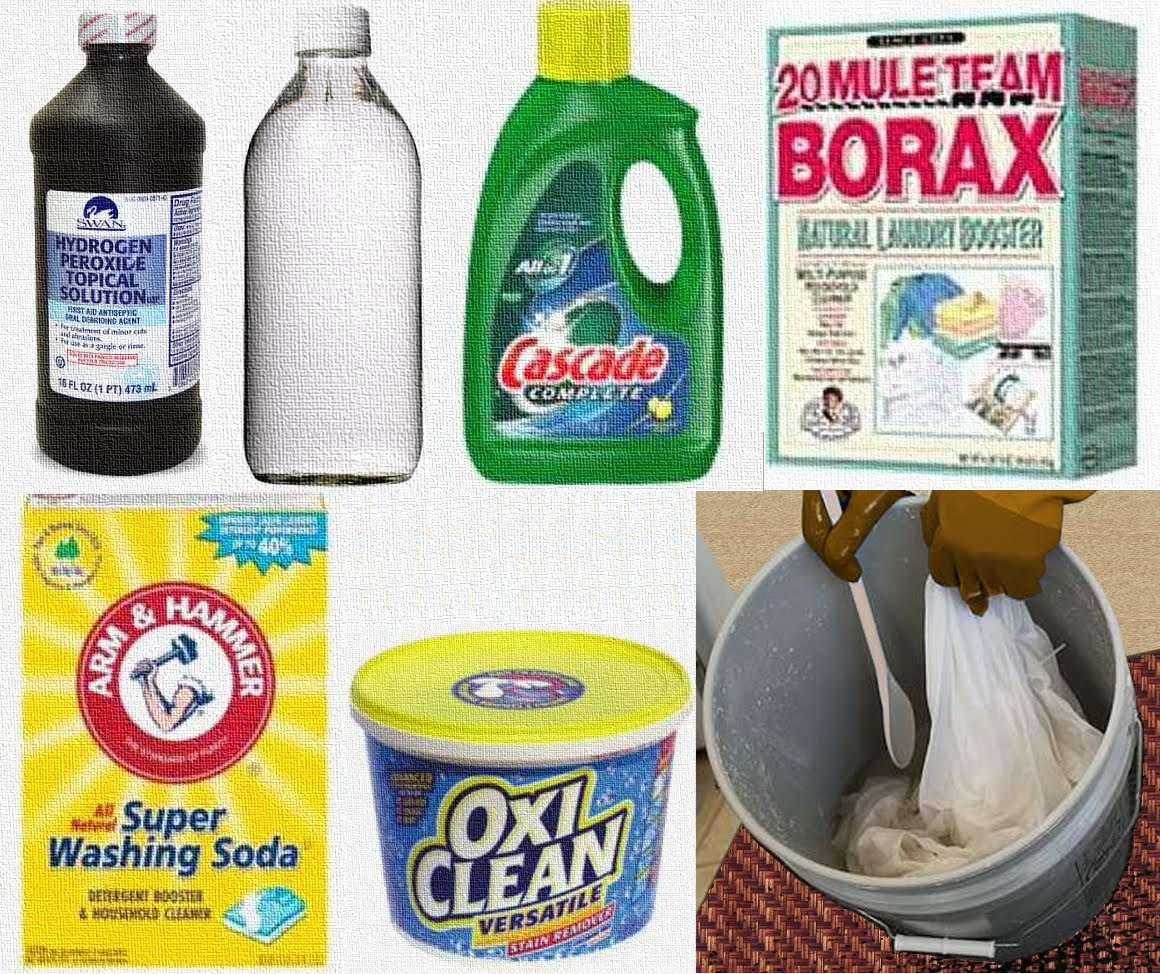
My family has elevated sweaty grimy greasy stains to an art form! This, combined with a limited budget for replacing clothing, has motivated me to find an all in one stain removing system that is easy and effective. I’ve used this recipe on jeans, brightly colored clothing and whites. I’ve not used it on many delicate fabrics, but if the garment was unusable because of an unsightly stain, I would give it a try. On the occasion that a stain is so firmly set that it will not be removed, I either dye it a darker color or send it to the scrap bin.

You will need two 5-gallon buckets with lids.

Combine the Following:
°2 cups borax
°2 cups washing soda
°1 cup OxiClean®
°1 cup Cascade Complete All-in-1 Gel
°1 cup hydrogen peroxide
°2 cups vinegar
°1 to 2 gallons of HOT water

Gradually add 1 to 2 gallons of HOT water while stirring the mixture. Be sure to stir well or the powder will clump into hard lumps. If this happens, you should be able to smash the clumps against the side of the bucket with a wooden spoon. Place the garments you wish to soak into a separate 5 gallon bucket. If I have a lot of items, I sometimes use 2 buckets, one for whites and another for colors. Pour the liquid over the fabric in the bucket. If using 2 buckets, equally divide the solution among them. Add more hot water so that the fabrics are immersed. Cover the bucket and allow it to soak overnight.

The next morning, dump the contents of the bucket into your washing machine (or wash tub) and send them through a rinse and spin cycle. Then, wash the clothes as you would normally. This works great for socks, dingy undershirts and linens. It would even be a good tool to use on yard sale finds.

This formula has evolved over time. Feel free to adjust it to suit your own needs.
read more “ STAIN REMOVAL & WHITENING SOAK ”

CAST IRON BUILDUP REMOVAL

Bookmark and Share
Cast iron cookware can become encumbered with gunk and rust. Thankfully, cast iron is very forgiving and with a little time can be stripped and refinished to its former glory. The method for removal is simple. The stripped metal gives you a good starting point to re-season your pan with a no-stick finish.

GET AS MUCH OFF AS YOU CAN BEFORE STRIPPINGpan in oven
Use hot water and vinegar to rinse after using salt and baking soda to clean as much of the debris off of your pan as possible. Dry the pan and place it into your oven, face down. You may want to line the bottom shelf with foil to catch drips. Set the temperature to 500 degrees, open a window and turn on an exhaust fan. Leave it baking for 1 hour, turn off the oven and allow the pan to cool inside your oven. This helps melt the excess grease off of your pan by taking it beyond its smoke point.

I include this step because if you have pans with a LOT of buildup, you will want to reduce the amount of oil left on the pans before you actually strip them down. In cooking applications, you wouldn’t want to heat oil past its smoke point because that releases free radicals (which are carcinogens). However, to get the oil off your pans, you will need to do this. Keep the room WELL ventilated.

Technically, this step could be skipped, but pans that have a thick layer of grease could catch fire. I recommend reducing the buildup first in order to decrease the likelihood of a grease fire BEFORE you subject the pan to the heat of a self-cleaning cycle -- during which the oven door will be automatically locked.

When the pan has cooled, remove it, wash and dry.

STRIPPING YOUR COOKWARE
Self-cleaning ovens are a convenient tool with which to strip your cast iron because they heat to approximately 900 degrees Fahrenheit (482 degrees Celsius). Such high temperature cycles burn off all food and oil debris. A safety feature keeps the oven door locked and closed during and immediately after the high-temperature cleaning cycle, which lasts approximately three hours, to prevent possible burn injuries. Usually, the door can be opened after the temperature cools to approximately 600 °F (300 °C).

You could actually skip the 500 degree baking and go straight to the self-cleaning step, but pans that have a thick layer of grease could catch fire. I recommend reducing the buildup as much as possible BEFORE you subject the pan to the self-cleaning cycle.

Many people leave their wire racks in the oven for this step, but it will strip and blacken your racks. Additionally, the consumer handbooks recommend removing the wire racks when using the self-cleaning cycle. I’ve found an alternative. Ceramic coffee mugs have already been kiln fired and can easily withstand the high temperatures. Simply position old mugs around the wire heating elements and perch the cast iron on top of them. Don’t use old bricks or stones, as these haven’t been glazed and may have water trapped inside, which would cause them to explode in the hot oven.

Keep the room well ventilated using an exhaust fan and an open window or door.

A RUSTIC ALTERNATIVE
If you don’t have a self-cleaning oven and have access to a fire pit, there is another alternative. Build a hot fire with hard wood. Soft, resinous woods will leave a blackened film on your pans. Once your fire is roaring hot, put your pan in the hot coals of the fire. Keep feeding the flame for a couple of hours. Allow it to die down and cool naturally. Remove your pan and scrub it clean.

RUST
You may find that there is a film of rust remaining on your cast iron. If this is the case, scrub this clear with coarse salt and baking soda. Rinse with hot water and dry carefully.


Follow safety precautions when working with heated metals, kitchen appliances and/or fire. This article is for information purposes only. The reader assumes all liability when utilizing these methods.
read more “ CAST IRON BUILDUP REMOVAL ”

ARE THERE HEALTH CONCERNS WITH MICROWAVE OVEN USE?

Bookmark and Share
Microwave ovens have been used in US homes for more than forty years. As long as the manufacturer’s procedures are followed, the FDA guidelines state that these are safe.

The War Department of the United States had detailed research on microwave ovens years before they were made available to the public. At the end of the second World War, this research was acquired. In search of an efficient way to provide meals to troops invading Russia, the Nazis had developed the first microwave ovens. The War Department of the United States held the Germans’ documented research for later study.

The Russians also acquired some of the German microwave ovens for biological testing. As a result of that testing, the Soviets issued international warnings about the health and environmental hazards of using microwave ovens and outlawed their use in Russia. Strict environmental limits were urged by Eastern European scientists who agreed with the Russian findings.

Thousands of workers that had been exposed to microwaves during the development of radar in the 1950s were tested by the Russians. It was determined that just being exposed to the energy field was enough to create health difficulties. The findings of the Russian scientists led to industry guidelines that limited exposure for industry workers to 10 microwatts and for civilians to 1 microwatt.

Adrenal exhaustion, anxiety, cancer, cataracts, dizziness, eye pain, hair loss, headaches, high blood pressure, inability to concentrate, irritability, ischemic heart disease, memory loss, nervous tension, an increased incidence of appendicitis, reproductive problems, sleeplessness, stomach pain, and chronic stress were found to be symptoms of microwave sickness experienced by those exposed to microwave radiation. Such symptoms would suggest inflammatory issues.

Russian teams of forensic scientists also studied the effects of microwave cooking on foods and the effect those foods had on people that ate them. Their findings were that ALL foods cooked in microwave ovens were damaged molecularly. Meats had destroyed and destabilized proteins and contained cancer-causing agents. Fruits and vegetables (chiefly root vegetables) cooked in a microwave formed free radicals. The basic substances found in fruits and vegetables had lowered levels of metabolic activity which interfered with digestibility and nutrient absorption. Subjects that ingested these items experienced digestive disorders caused by the inconsistent catabolism of micro-waved foods. This included an elevated number of intestinal cancers and cellular degeneration of peripheral tissues. Testing confirmed changes in the immune system and blood. Cancer cells were found elevated in the blood and were accompanied by malfunctions of the Lymphatic system which caused degeneration of the immune system.

Many US cooks decried the use of microwave ovens when first introduced. There were hot debates on whether tampering with the molecules in foods would make them unsafe for consumption. The results of the Russian research raised concerns that were shared by other countries which also banned microwave ovens. In the United States, citizens were assured that microwave ovens were safe for food preparation.

Perestroika arrived in 1987 and Russia removed the restrictions on microwave ovens.


Dr. Mark Vinick explains how microwaves cook violently,
changing and damaging foods and the nutrients they provide.


By 1991, the assurances of safety had reached the surgical staff of Hillcrest Medical Center located in Tulsa, OK. A successful hip replacement procedure had been performed on Norma Levitt, and she was still in the operating room. Because the blood warming device was not working that day, a unit of her own blood was warmed by placing it into a microwave oven located in the employee lounge. Within minutes of receiving this blood, a blood clot killed Norma. The hospital defended its actions saying that Norma’s death had nothing to do with her micro-waved blood; the FDA published warnings against use of a microwave oven when warming blood products.

Before Norma’s demise, scientific studies were being conducted by Dr. Hans Ulrich Hertel on the effects of micro-waved foods on humans. People that ate foods on an empty stomach submitted blood samples before and after eating. Comparisons were made between the blood of persons that ate raw foods, foods cooked conventionally and micro-waved foods as well as to the samples taken before eating. There were considerable variances in the blood samples of the volunteers that ate micro-waved foods. Dr. Hertel’s findings showed that eating micro-waved foods generated changes in the blood that mirrored the cancer’s pathology.

It was determined by Dr. Hertel that definite risks to health were associated with foods prepared using a microwave oven. He further stated that eating foods subjected to microwave cooking would have cancerous effects on human blood. In December of 1991, the Journal Franz Webber published his findings along with an article about Dr. Hertel.

Trade laws and the Swiss court were used by manufacturers of microwave ovens to silence Dr. Hertel, threatening him with personal ruin if he disclosed his findings. Dr. Hertel was prohibited from further publication of his studies and found guilty of “interfering with commerce” in March of 1993. This judgment was overturned August 25, 1998 in Strasbourg, Austria. The Swiss government was ordered to compensate Dr. Hertel.

Regulatory agencies, retailers and manufacturers insist that these appliances pose no health risks. These assurances however, are contradictory to the findings of published studies that find otherwise. It is worth it to take the time to judge not only how best our foods should be farmed and collected, but how those foods should best be readied to grace our table.


ALICE WATERS is interviewed for a 60 Minutes segment by Leslie Stahl.
In the clip below, Leslie asks, "Where’s your microwave?"
Alice: "I don't have a microwave."
Leslie: "How do you live without a microwave?!"
Alice: "I don’t know how you'd consider to live WITH one."


read more “ ARE THERE HEALTH CONCERNS WITH MICROWAVE OVEN USE? ”

EARTHQUAKE PREPAREDNESS AT HOME

Bookmark and Share
Before the shaking starts, there are some steps you can take that will help make your home safer in the event of an earthquake.

STRUCTURAL ADJUSTMENTS
If you live in a home built before 1940, the structure may not be able to withstand the force of an earthquake. Some of these buildings are not bolted to the foundation. Consider having the structure inspected. If you use gas utilities, consider installing an automatic gas shutoff valve. Water heaters can be strapped in place at the top and bottom of the tank. Chimneys can be secured by strapping them to the roof of the house.

FURNISHINGS
Large pieces of furniture should be bolted to studs in the wall. This includes free standing cabinets and bookcases. Your local hardware store should have the appropriate strapping and hardware necessary. This is also an appropriate safety measure for homes with small children. In the event that a large furniture piece is climbed, these straps can keep them from falling onto and crushing a little one. Some manufacturers include these straps with the furniture.

CABINETS & DRAWERS
Install child safety latches to keep your cabinet doors and drawers from flying open in the event of a tremor. Computers, monitors and other electronics should be secured into place with Velcro straps.

SHELVING
Bookshelves should be moved away from beds so that objects cannot fall on sleeping persons. For breakables on display, use museum wax to fix them securely to a shelf. This is used by museums to secure breakables. Adding a lip to the edge of shelving can keep books & other items from sliding off and causing injury during smaller tremors.

AS ALWAYS
This article should be used as a guideline. The reader assumes all liability when utilizing these measures.
read more “ EARTHQUAKE PREPAREDNESS AT HOME ”

HOMEMADE DISHWASHER POWDER

Bookmark and Share
There are a LOT of recipes for dishwashing soap. I don’t claim to have the best recipe, but I will share what works for me.

WHY NOT USE SOAP?
For dishwashers, you need cleaning power, not soapy suds. If you were to place regular soap flakes into a dishwashing machine, your kitchen floor would soon be filled with lots of bubbles. For a dishwasher, the detergent needs to break down grease, disinfect and rinse clean without leaving soap spots.

ESSENTIAL OILS?
I don’t use essential oils in my dishwasher powder. Very hot conditions will neutralize the scent of an essential oil. Good quality essential oils are pricey, so I prefer to use them in applications where they won’t be diminished. Feel free to add essential oil if that is your preference.

KAY’S DISHWASHER POWDER:
Mix together 2 cups Borax, 2 cups Baking Soda, ½ Cup salt and 1 cup citric acid.
This makes enough powder to just fit inside a quart sized zippered freezer bag. I place this inside a larger gallon sized zippered bag. This is to seal moisture out. The citric acid and baking soda will absorb moisture from the air and clump if the bag is not sealed. I use a DRY kitchen spoon to place a couple of tablespoons of powder in my machine per load. Using this, I’ve never had to use any spot-free solutions for the rinse/drying cycle.

This powder can also be used to wash dishes by hand. Vinegar in your rinse water is helpful for containers that have greasy residue.

A HANDY TIP:
I keep a soap dish next to my kitchen sink. The bottom of this dish has drainage holes. I place a sponge beneath these holes so that when the bar soap is used, it drains onto the sponge. If I need to spot clean a dish or a soiled surface, I simply moisten this sponge and use it.


This article is for information purposes only. Utilize these methods at your own risk and using your own discretion.
read more “ HOMEMADE DISHWASHER POWDER ”

SCOURING POWDER & SPRAY CLEANERS

Bookmark and Share
Grandma managed to keep her home clean long before there was an aisle in the grocery store devoted to perfumed products that promised to make her job easier. Dependence on retail cleaners can leave you wondering if you aren’t spending WAY too much on the latest chemical goo.

The good news is that you can keep more of your hard-earned money AND get your house clean without lots of toxic chemicals. Here are four simple products that you can make to clean several areas of your home.

SCOURING POWDER
This is a nice, non-abrasive cleaner that can be used by applying it to a wet sponge and rubbing in a circular motion. You can use Baking Soda alone, but for extra water softening and germ-fighting I use 1 part Borax, 2 parts Baking Soda and ½ part salt. This will take care of some stubborn stains without scratching delicate surfaces. I keep mine in a wide-mouthed container with shaker holes beneath a closeable lid.

ALL PURPOSE SPRAY/RINSE
Used as a rinse for the homemade scouring powder, this will create a foaming action. Mix white vinegar and water in equal parts. Place your solution in a pistol-grip sprayer. Spray surfaces you’ve used the scouring powder on, wipe with a damp sponge and rinse. It leaves a gleaming shine. The vinegar cuts the grease and also has anti-bacterial properties. By itself, this is also useful to wipe down tables, counter tops and clean glass and windows. If you use this as an after shower/bath spray it will also discourage mold on your grout.

HARD SURFACE, GLASS & DISINFECTANT/CLEANER
Mix 1 part rubbing alcohol with 1 part water. For every 2 cups of solution, add 3 tablespoons of white vinegar. Place into a spray container and use to clean hard surfaces that you want germ and streak-free. I like to use this to wipe down metal surfaces as it quickly dries without leaving spots. I also like to use it on light switches, doorknobs, and other surfaces that have a multitude of little hands on them.

SOAP SCUM & MOLD TREATMENT
Hard water causes soap to cling to surfaces in the shower and tub. This can lead to a problem with mold. A spray-on treatment for this is to use one part Hydrogen Peroxide and two parts water. Place it into a spray bottle and spray onto the surface. Let it sit for an hour and then clean with scouring powder.


This article is for information purposes only. Utilize these methods at your own risk and using your own discretion.
read more “ SCOURING POWDER & SPRAY CLEANERS ”

BUY THE VISION & SAVE!! -- TWO DAYS ONLY

Bookmark and Share
Readers of this blog will be glad to know that the publishers of THE VISION have partnered with 6 companies to help promote the new novel by best-selling author Debi Pearl. THE VISION has been on the Amazon’s Top 100 a total of 5 times since its release on 7/1/09 and has earned the right to be called an Amazon Best Seller. Now you can be part of the push to reach #1 on Barnes and Noble.

When you to order THE VISION from Barnes and Noble on 11/3 or 11/4, SIX companies will offer a 25% discount off of merchandise purchased from their web store (no other discounts apply). This is just in time for the Holidays!

As a thank you for your purchase of THE VISION, it is possible to save hundreds of dollars, depending on the products you decide to purchase. In addition to the savings, the purchase offer includes free downloadable EBooks. **

Now is the time to start your Holiday Savings! Follow the links to visit these fine merchants prior to receiving your coupon codes. REMEMBER: the purchase date must be 11/3 or 11/4 to qualify for 25% off savings and free EBooks. **

TAKE ADVANTAGE OF THIS OFFER!
Order THE VISION by Debi Pearl from BarnesandNoble.com on November 3rd or 4th, 2009 (offer good on these days only) and you will receive coupon codes from the following companies offering 25% discounts from their webstores. Discounts cannot be combined with other discounts.

1. Ancient Healing Oils
2. The Bulk Herb Store
3. College Plus!
4. More Than Alive
5. No Greater Joy
6. The Mission Ball

PLUS! You will also receive free downloadable ebooks and bonus gifts from Gary D. Foster Consulting (see details below).


HERE’S HOW TO ORDER!!
On November 3rd or 4th...
1. Visit www.DebiPearl.com
2. Click the Barnes & Noble link to place your order.
3. Email your receipt immediately to Mel Cohen to receive your coupon codes.
Coupon codes expire on 11/9/09.


<<>>**FREE E-BOOKS FROM GARY D. FOSTER CONSULTING**<<>>

Distance Learning for the 21st Century-
These days, you don't need to spend years on a college campus to earn your degree. In fact, you can cut your tuition costs by 50% and graduate in two years or less through CLEP exams and online classes. Read this EBook and start your distance learning degree today!

Earning Dual Credit: How to Combine High School and College-
High school students may not realize it but the study they're doing in high school can actually count for college credit through CLEP exams. In fact, they don't need to wait until graduation to do college-level coursework either. Find out how high schoolers can graduate college by age 18 for a fraction of the time and cost of the traditional college system.

Herbal Alternatives-
You will discover how herbs can be used as healthy alternatives. This book provides “How To” directions for numerous home remedies for adults and children. Discover the use of herbs as; Antibiotics, Tinctures, Oil Extracts, dosages and more. Learn to make your own Salves and Ointments. The secrets of building immunity in your children are reveled. This is a MUST READ!

FREE 3-MONTH SUBSCRIPTION The Foster Letter-
The Foster Letter is a biweekly publication that will be sent to you via email. It provides a Religious Market Update, and is An Executive Marketplace Intelligence Report for Business and Ministry Decision Makers.
read more “ BUY THE VISION & SAVE!! -- TWO DAYS ONLY ”

MAKE YOUR OWN WIPES

Bookmark and Share
I began making personal wipes as a way to save money on baby wipes. However, the usefulness and economy of these wipes have outlasted diapering and potty training adventures. They are great for freshening up when camping or traveling.

My babies went without rashes from chemical additives, fragrances and preservatives used in commercial wipes. I have found that the anti-fungal additives and preservatives are only needed if the bucket is not cleaned with a vinegar rinse between uses and/or if tap water is used instead of filtered or distilled water.

The recipe I use is simple. There are recipes that call for adding lotions, oils and various preservatives. I don't use them and my wipes stay fresh. ~ I avoid all of those and have wipes that remain fresh.

You will need a gallon-sized plastic bucket with a snap-on lid. Cut a small hole in the center of the lid. Clean the bucket carefully with hot water and soap. Rinse with vinegar and water. This will keep mold from forming. If mold forms the wipes will have an unpleasant odor and can contribute to diaper rashes.

Use a roll of Bounty Big Roll select-a-size paper towels. You can find cheaper paper towels, but they will fall apart. Cut the paper towel roll in half. A long serrated knife works best for this. One roll will supply wipes for two buckets.

Add two tablespoons of hypoallergenic baby bath soap to two cups of filtered or distilled water (not from the tap). Stir this well and pour into the bucket.

Remove the cardboard center from one of the half-rolls of paper towels. Place the half-roll, cut side down, into the bucket, threading the first sheet from the center of the roll through the hole in the lid and then snap the lid closed. In about 5 minutes, the towels will have soaked up the water and will be ready for use.

The ratio of 2 tablespoons baby bath soap to 2 cups water doesn't leave a yucky residue on baby’s skin. Using hypoallergenic liquid baby bath soap (or homemade), my babies didn’t have a problem with rashes. The pediatrician thought it was magic. I think it’s just because I had an economical and easy way to make sure my babies were clean and dry. I saved even more money by not needing additional lotions and potions to treat irritated bottoms. As a bonus, wipes can be used in place of hand sanitizers and makeup remover wipes.

WHAT IF THE BUCKET IS TOO BIG FOR MY BAG?
Just pull several wipes from your bucket dispenser and place them into a water tight, clean re-sealable container. This can be a zippered bag or a snap-tight sandwich container. As with the bucket, clean these containers between uses with a vinegar and water rinse and dry them.

CAN I MAKE MY OWN LIQUID SOAP?
Grate a 4 to 6 ounce bar of homemade soap (or Fels-Naptha). Warm about 4 of cups of filtered (or distilled) water to boiling. Gradually add your grated soap and stir in each small handful so that you don’t have a clump of soap and the flakes have time to melt. When the soap is melted, blend this with enough filtered or distilled water to make a gallon. This will thicken as it cools. Use in place of baby bath soap in your wipes. It will also serve as a refill for your soap dispensers.

ALTERNATE BABY OILS
If your baby does get a rash, I recommend applying coconut oil to clean, dry skin. Coconut oil has anti-microbial properties and hasn’t any of the fragrances or petroleum products that are found in many over the counter products. Extra virgin olive oil is another nice oil for baby’s skin.


This article is for information purposes and designed for the reader’s benefit. Utilize these methods at your own risk, using discretion. Readers are encouraged to be well informed and draw their own conclusions.


read more “ MAKE YOUR OWN WIPES ”

HOW TO MAKE CANDLE WICKS

Bookmark and Share
You may have seen a candle-making demonstration where participants are invited to dip strings into hot wax and then cool them in cold water. The finished product often looks more like a bent pepper than a candle. Should you decide to make usable candles, you’ll first want to know how to fashion wicks.

A WICK’S PURPOSE
Wicks aren’t just pieces of string in the center of a candle. The flame of a candle is not made by the wick. Rather, the heated wax creates a vapor which ignites as the flame is carried to the candle’s body by the wick. The flame you see is the vapor being consumed.

To produce a brightly burning, reliable candle, you will require a well-made wick. Use 100% cotton yarn or thread without any dye or bleach. Any thin cotton string, found in some craft or garden supply stores, will suffice.

Wire-core wicks are available commercially and are rigid, but these can contain lead and other metallic toxins that release vapors into the air when a candle is burned. I strongly advise against using these. It is better to have a wick stiffened by proper priming.

SOAK YOUR COTTON
Section at least three pieces of cotton yarn or string. If you are dipping candles, you will want the length of your twine to equal twice the height of your finished candle plus another twelve inches. The reason for this is that a single wick will have a candle formed at each end. If you prefer to make a single candle, cut the wick to equal the height of your candle plus another six inches.

Let the cotton soak in one these solutions all night:

1st Solution
One Tbs salt, two Tbs boric acid (makes the flame deep red), and 1 c. warm water

2nd Solution
2 Tbs salt, 4 Tbs Borax (makes the flame yellowish green) & 1 ½ cups warm water

3rd Solution
Two and a half tablespoons of salt with five and a half tablespoons of Borax in two cups warm water.

OPTIONAL CHEMICALS
Choose one of the following for a different color flame:
  • A tsp of calcium burns reddish orange.
  • A tsp of table salt brings a yellow flame.
  • A tsp of Borax has a yellowish-green appearance.
  • Add a teaspoon of potassium sulfate or saltpeter (potassium nitrate) for a purple flame.
  • A tsp of Epsom salts burns white.
  • A tsp of alum burns green.
The next morning, take the string from the solution and hang until dried completely – for as long as five days.

Braid the dried strands together as tightly as possible.

BRAIDS USED FOR WICKS
Use a flat braid for candles that are tapered. This flattened braid will have a slight curl when it burns. If the wick is matched properly to the size of the candle, the natural curl of the flat braid will reduce the carbon buildup and make the wick self trimming. The ply of a wick refers to the number of strands used to create it. A wick’s ply will tell you if the candle should be a larger or smaller size.

Block candles (without a tapered end) require a square braided wick. Block candles are formed by pouring wax into molds that can be round or square. The square braid is braided in the round and is not flat.

Whichever braid you select, it should be bound tightly. A candle will burn longer and brighter with a quality wick. A loose, poorly constructed wick will shorten the life of your candle.

HOW TO PRIME A WICK
Priming a wick helps to insure that your candles will light more easily. Your primed wick will burn more consistently. Additionally, the wax makes your wick water-resistant. Cotton wicks would easily absorb water otherwise.

Dipping your wick into hot wax until it is thoroughly saturated will prime your wick. When you see bubbles, you will know the wax is saturating your wick. To protect your fingers, you should use a small clip to hold the braid as you dip it. Take the wick out of the wax, tug it taught, lower it into water and then lay it onto waxed paper. Use a paper towel to dab off any excess water. Allow as least 30 seconds for each wick to dry. To encourage stiffness, repeat this process several times. When you are finished, primed wicks can be stored in rolled newspapers.

GUIDELINES FOR SAFETY
If wax boils, it is flammable. Baking soda or a fire extinguisher should be used to stop a fire involving wax. Water will just cause the wax (and the fire) to spread; don’t use it.

Use a double boiler to heat wax; it shouldn’t be placed directly on the heat source. Make your own by placing water at a 3-inch or so depth in a large pot. Put something (i.e. old tuna can or metal cookie cutter) onto the bottom of this pot to act as a barrier between it and the wax container. Bring the water to a boil. Place the wax into a can and lower this onto the barrier in the pot of boiling water.

It is best to work with hot wax while children and pets are away.

Hot wax should never be discarded down a drain. When the wax hardens, it will clog your pipes.

FEATURED VIDEO

read more “ HOW TO MAKE CANDLE WICKS ”

MAKE YOUR OWN LYE

Bookmark and Share
Soap is a combination of three ingredients: fat, water and lye. In addition to use in soap recipes, lye can be used to clean containers where oil or protein-based deposits have adhered. It is a common ingredient in oven cleaners. It can be used as a paint stripper, but on wood it will raise the grain. Lye solutions have long been used as drain cleaning agents because they decompose soap and hair.

How is this different than the stuff I buy in the store?
Wood ash lye has a different chemical makeup than commercially produced lye. Lye made from wood ash is potassium hydroxide. Lye made commercially is sodium hydroxide. These two products are not interchangeable. The amount of lye you use in a recipe varies based on which product you are using.

What's the best ash to use?
The best ash to use to produce lye (sodium hydroxide) is from hardwoods like oak or maple or fruit trees like apple. Avoid using wood from pine trees or evergreens. The wood must be burned at high temperatures with lots of oxygen so that the wood is completely consumed leaving white, paper thin ash, not chunks of charcoal.

Collect enough hardwood ash to fill a waterproof non-metal bucket to within 3 or 4 inches of its top edge. This container may be as small as a five gallon plastic container or as large as a wooden barrel.

CONTAINERS
You will need two non-metals containers for your project. One bucket will hold the ash, the other container will catch the runoff. Drill a small hole near the bottom of the ash container. This hole should be small enough that it can be stopped with a non-metal object like a small cork, toothpick or dowel.

In the bottom of the ash container, place a layer of clean river gravel. On top of this, place about 4 inches of packed straw, hay or grass. Fill the remainder of the bucket with wood ash (stop 3 to 4 inches below the top) and tamp it down firmly.

WATER
Collect 5 or more gallons of soft water. Soft water is water with little or no mineral content. This water can be acquired by use of a specialized filter, or from peat or, sandstone or lava rock sources like granite. Another alternative is to distill the water you have. However, the simplest way to acquire soft water is by collecting rainwater.

WORKSPACE
Put your ash container in a secure location away from high traffic areas or places that children or animals might bump, or knock it over. The container you will use to catch the runoff can be glass or even an enamel surfaced pan. Metal containers will react to the lye which could eat holes in the container. Find a position for this catch container that is close enough to the ash bucket to prevent unnecessary splashing during drainage.

SAFETY & PRECAUTIONS
Lye may cause blindness. If swallowed it can be fatal. Potassium hydroxide (lye) is caustic and can burn anything that it touches, especially fats and oil on skin. This reaction creates salts which can cause severe chemical burns, permanent injury or scarring. Lye burns can be so severe as to cause nerve damage, so you may not feel the burn right away.

It is necessary to take safety precautions before you begin the process. Work in a well ventilated area. Have contact information for emergency and poison control on hand. Dress appropriately. Wear rubber gloves (the big yellow kind), long sleeves, have your legs covered and wear safety goggles. Keep vinegar nearby in order to neutralize any skin burns. Do NOT wash with water following contact with this substance as this will merely exacerbate the corrosive affect.

THE PROCESS
Use a broom handle or dowel to create an indentation in the packed ashes. Bring 1 gallon of your soft water to a boil. Carefully pour this into the ash bucket. The water will react with the ash by bubbling, spitting and splashing. When this action calms, slowly add another gallon of water to the ash bucket. If the level of the ashes sinks, add more ash to the bucket. Continue to add water until the ashes are covered. Place a lid over the top of the ash container.

Remove the stopper from the hole at the bottom of the ash bucket and allow the runoff to drip into your catch container. This can take a whole day.

Repeat this process on days 2 and 3 by pouring the runoff through the ashes again. This will add to the strength of your lye.

An alternative method is to add the water to the ash container while the stopper is still in place. Cover the container and allow the water to sit for about 3 days. Make sure it is in an area where it can't get spilled. After three days, remove the stopper and drain.

TESTING STRENGTH
The resulting liquid is lye water (potassium hydroxide). To test its strength place a fresh egg (still in its shell) into the liquid. It should float on top with a nickel-sized or quarter-sized area exposed above the surface (2 cm to 2.5 cm diameter). If the egg sinks, the lye water is too weak for soap making. If the egg bobs on top of the surface, the lye is too strong and needs diluting with more rainwater. Be sure to dispose of the egg after use.

If the lye water is too weak, heat it to reduce the amount of liquid. Enamel finished pans are safe for this as long as they are never again utilized in cooking foods. Be careful when heating lye as it can be scorched. The solution is strong enough when a chicken feather touched to the heating lye starts to dissolve. Remove the lye water from the heat to cool.

STORAGE
Store lye water in jars with plenty of head room to allow for safety in pouring. Keep in a cool, dark place in tightly sealed containers, away from curious children.

Dispose of the old leached ashes in a hole dug away from high traffic areas. Allow this to cool thoroughly before re-filling the hole.

MAKING CRYSTALLIZED LYE -- POTASH
If you wish to dry your lye into potash crystals, place the water into a lye-safe container. Glass is a good choice for this application. Leave the container uncovered in the sun until the water evaporates. Follow the same storage precautions with potash crystals as you would the lye water.

Here's a video I found on YouTube that shows a Living History interpreter explaining how settlers used to make their own lye from ashes using an ash hopper. The sound level is low, but the information is good.

read more “ MAKE YOUR OWN LYE ”

WHY SHOP AT iHERB?

Bookmark and Share
Let me tell you about a company that has been a wonderful blessing to me and my family on our journey to healthy living on a tight budget.

BIG SAVINGS
iHerb.com finds popular products and supplements and makes them available at low prices. Even better, with minimum purchases, they offer free shipping. That's a BIG savings when you are purchasing a heavy product such as organic coconut oil. I save gasoline, time and money when I purchase from iHerb because their prices are often lower than those offered by my local retailer -- And iHerb delivers!

FREE STUFF!!
Low prices and deals on shipping aren't all that iHerb offers. There is also a page on their site that offers FREE items. That's right, they often have sample size and introductory offers that you can include in your cart on checkout. There have even been instances when I was in a rush with my order, didn't select any freebies and they STILL slipped some treats into the box.

A VARIETY OF QUALITY PRODUCTS
Household items, toiletries, grocery items, herbs, and supplements are all available. I've often found myself running across an expensive brand name supplement while researching a condition only to find it at a much lower price at iHerb.

REWARDS FOR REFERRALS
For additional savings, when you make your first purchase from iHerb, use the discount code ZOS006 when you check out. Just cut and paste it -- ZOS006. That will knock $5 off your total! This is part of their REWARDS program for their customers. Once you've become a customer of iHerb, you can enjoy additional savings by recommending them to others. Sign up and you'll be assigned a code number that you can share with others for big savings. You can read more iHerb's reward program on their information page.


A GREAT RESOURCE
Even if you don't wish to purchase anything right away, you'll still want to check out their web site. They include a page of links that are valuable to anyone who would like to look over a natural library, medical library or research some conditions. Also included are links to cutting edge health practitioners. It's even a nice site to visit if you want to be sure you are getting a good price on an item. My personal rule is that if another retailer is able to beat iHerb's price and shipping savings, THAT'S a good price!

CUSTOMER SERVICE
I've always received very speedy service from iHerb. I've had to change orders and found them to be very willing to accommodate me. Friendly people, great service, quality products and low prices. If you haven't shopped there yet, you'll be glad you found them. This is one company I am glad to recommend to friends and family.


read more “ WHY SHOP AT iHERB? ”