I love discovering things that make life work just a little better. I'm a proponent of free access to solid information. Enjoy your time here and do visit often!
My family has elevated sweaty grimy greasy stains to an art form! This, combined with a limited budget for replacing clothing, has motivated me to find an all in one stain removing system that is easy and effective. I’ve used this recipe on jeans, brightly colored clothing and whites. I’ve not used it on many delicate fabrics, but if the garment was unusable because of an unsightly stain, I would give it a try. On the occasion that a stain is so firmly set that it will not be removed, I either dye it a darker color or send it to the scrap bin.
You will need two 5-gallon buckets with lids.
Combine the Following: °2 cups borax °2 cups washing soda °1 cup OxiClean® °1 cup Cascade Complete All-in-1 Gel °1 cup hydrogen peroxide °2 cups vinegar °1 to 2 gallons of HOT water
Gradually add 1 to 2 gallons of HOT water while stirring the mixture. Be sure to stir well or the powder will clump into hard lumps. If this happens, you should be able to smash the clumps against the side of the bucket with a wooden spoon. Place the garments you wish to soak into a separate 5 gallon bucket. If I have a lot of items, I sometimes use 2 buckets, one for whites and another for colors. Pour the liquid over the fabric in the bucket. If using 2 buckets, equally divide the solution among them. Add more hot water so that the fabrics are immersed. Cover the bucket and allow it to soak overnight.
The next morning, dump the contents of the bucket into your washing machine (or wash tub) and send them through a rinse and spin cycle. Then, wash the clothes as you would normally. This works great for socks, dingy undershirts and linens. It would even be a good tool to use on yard sale finds.
This formula has evolved over time. Feel free to adjust it to suit your own needs.
Infusing oil with your choice of herbs is a simple process that can be done using either a hot or cold method. In either method, I recommend using pressed oil of food grade quality. Olive and sesame seed oils are both made using this method, but check your labels. Many oils are made with chemical extraction and contain petroleum byproducts. When using topical applications, be mindful that human skin is permeable and some constituents and trace elements can penetrate.
HOT INFUSION – This can be used with either dried or fresh herbs.
Use a double boiler or a metal bowl resting over a pan of simmering water. Place a generous 1 ½ cup measurement of herbs crumbled, minced or chopped into the bowl. Add to this about 3 cups of oil. Generally, you will want to have twice the measure of oil as dried herb. Gently simmer the mixture for about three hours. Be sure that the oil doesn’t boil. You don’t want to burn or fry your herbs as this will cause them to lose their beneficial properties. Strain the herbs by pouring the oil through a clean cloth, reserving the oil in a clean glass jar with a lid.
COLD INFUSION – This is for use with dried herbs.
Place enough dried herbs into a jar to fill it within an inch of the jar’s rim. Be sure that your herbs have been completely dried or the water content will lead to rancidity. Add enough oil to cover the herbs. Cover with a clean lid and set into a sunny spot for 2 to 6 weeks time. I prefer 21 days in the summer sun. The heat from the sun will release the plant constituents into the oil. Once the oil has had a chance to infuse, filter the oil through a clean cloth. Store the infused oil in a clean glass bottle.
Infused oils are best used fresh, but will keep for about a year.
HOW DO I USE INFUSED OILS?
MEDICINALLY, infused oils are soothing carriers of the beneficial properties of herbs. A good selection of herbs for this purpose would be those with high tannin content which are soothing to the skin and/or muscles. Goldenrod is one herb which is used to benefit muscle aches and pains.
FOR CULINARY USE, olive oil is often infused with ingredients such as zested lemon peel, oregano, rosemary and peppercorns. The dried herbs should be bruised and/or crushed using a mortar and pestle. Fresh herbs should be finely chopped. For a decorative look, the oil can be placed in a decorative glass bottle with bits of the ingredients immersed in the oil and sealed with a cork. These oils can be used as salad dressing and for dipping breads.
IN SOAPMAKING AND TOILETRIES infused oils can offer the color, aromatic, and medicinal properties of the herbs to your favorite beauty recipe. Lavender, Rosemary, and Catnip are a good choice for mosquito repellant oil. Consider fragrant plants and herbs for your beauty lotions and creams made with infused oils.
In the book THE VISION by Debi Pearl, a local herbalist makes a gift of several herbs and booklets to a pregnant woman. This may seem an inappropriate gift to give a woman facing busy motherhood, but the gift of information is one which continues to grow. As with most things herbal, your creativity increases with the doing. Make a simple infused oil today, and you’ll likely find a dozen other ways to use it tomorrow. Order your copy of THE VISION to read about more examples of herbs used in daily living.
Soap is a combination of three ingredients: fat, water and lye. In addition to use in soap recipes, lye can be used to clean containers where oil or protein-based deposits have adhered. It is a common ingredient in oven cleaners. It can be used as a paint stripper, but on wood it will raise the grain. Lye solutions have long been used as drain cleaning agents because they decompose soap and hair.
How is this different than the stuff I buy in the store? Wood ash lye has a different chemical makeup than commercially produced lye. Lye made from wood ash is potassium hydroxide. Lye made commercially is sodium hydroxide. These two products are not interchangeable. The amount of lye you use in a recipe varies based on which product you are using.
What's the best ash to use? The best ash to use to produce lye (sodium hydroxide) is from hardwoods like oak or maple or fruit trees like apple. Avoid using wood from pine trees or evergreens. The wood must be burned at high temperatures with lots of oxygen so that the wood is completely consumed leaving white, paper thin ash, not chunks of charcoal.
Collect enough hardwood ash to fill a waterproof non-metal bucket to within 3 or 4 inches of its top edge. This container may be as small as a five gallon plastic container or as large as a wooden barrel.
CONTAINERS You will need two non-metals containers for your project. One bucket will hold the ash, the other container will catch the runoff. Drill a small hole near the bottom of the ash container. This hole should be small enough that it can be stopped with a non-metal object like a small cork, toothpick or dowel. In the bottom of the ash container, place a layer of clean river gravel. On top of this, place about 4 inches of packed straw, hay or grass. Fill the remainder of the bucket with wood ash (stop 3 to 4 inches below the top) and tamp it down firmly.
WATER Collect 5 or more gallons of soft water. Soft water is water with little or no mineral content. This water can be acquired by use of a specialized filter, or from peat or, sandstone or lava rock sources like granite. Another alternative is to distill the water you have. However, the simplest way to acquire soft water is by collecting rainwater.
WORKSPACE Put your ash container in a secure location away from high traffic areas or places that children or animals might bump, or knock it over. The container you will use to catch the runoff can be glass or even an enamel surfaced pan. Metal containers will react to the lye which could eat holes in the container. Find a position for this catch container that is close enough to the ash bucket to prevent unnecessary splashing during drainage.
SAFETY & PRECAUTIONS Lye may cause blindness. If swallowed it can be fatal. Potassium hydroxide (lye) is caustic and can burn anything that it touches, especially fats and oil on skin. This reaction creates salts which can cause severe chemical burns, permanent injury or scarring. Lye burns can be so severe as to cause nerve damage, so you may not feel the burn right away.
It is necessary to take safety precautions before you begin the process. Work in a well ventilated area. Have contact information for emergency and poison control on hand. Dress appropriately. Wear rubber gloves (the big yellow kind), long sleeves, have your legs covered and wear safety goggles. Keep vinegar nearby in order to neutralize any skin burns. Do NOT wash with water following contact with this substance as this will merely exacerbate the corrosive affect.
THE PROCESS Use a broom handle or dowel to create an indentation in the packed ashes. Bring 1 gallon of your soft water to a boil. Carefully pour this into the ash bucket. The water will react with the ash by bubbling, spitting and splashing. When this action calms, slowly add another gallon of water to the ash bucket. If the level of the ashes sinks, add more ash to the bucket. Continue to add water until the ashes are covered. Place a lid over the top of the ash container.
Remove the stopper from the hole at the bottom of the ash bucket and allow the runoff to drip into your catch container. This can take a whole day.
Repeat this process on days 2 and 3 by pouring the runoff through the ashes again. This will add to the strength of your lye.
An alternative method is to add the water to the ash container while the stopper is still in place. Cover the container and allow the water to sit for about 3 days. Make sure it is in an area where it can't get spilled. After three days, remove the stopper and drain.
TESTING STRENGTH The resulting liquid is lye water (potassium hydroxide). To test its strength place a fresh egg (still in its shell) into the liquid. It should float on top with a nickel-sized or quarter-sized area exposed above the surface (2 cm to 2.5 cm diameter). If the egg sinks, the lye water is too weak for soap making. If the egg bobs on top of the surface, the lye is too strong and needs diluting with more rainwater. Be sure to dispose of the egg after use.
If the lye water is too weak, heat it to reduce the amount of liquid. Enamel finished pans are safe for this as long as they are never again utilized in cooking foods. Be careful when heating lye as it can be scorched. The solution is strong enough when a chicken feather touched to the heating lye starts to dissolve. Remove the lye water from the heat to cool.
STORAGE Store lye water in jars with plenty of head room to allow for safety in pouring. Keep in a cool, dark place in tightly sealed containers, away from curious children.
Dispose of the old leached ashes in a hole dug away from high traffic areas. Allow this to cool thoroughly before re-filling the hole.
MAKING CRYSTALLIZED LYE -- POTASH If you wish to dry your lye into potash crystals, place the water into a lye-safe container. Glass is a good choice for this application. Leave the container uncovered in the sun until the water evaporates. Follow the same storage precautions with potash crystals as you would the lye water.
Here's a video I found on YouTube that shows a Living History interpreter explaining how settlers used to make their own lye from ashes using an ash hopper. The sound level is low, but the information is good.


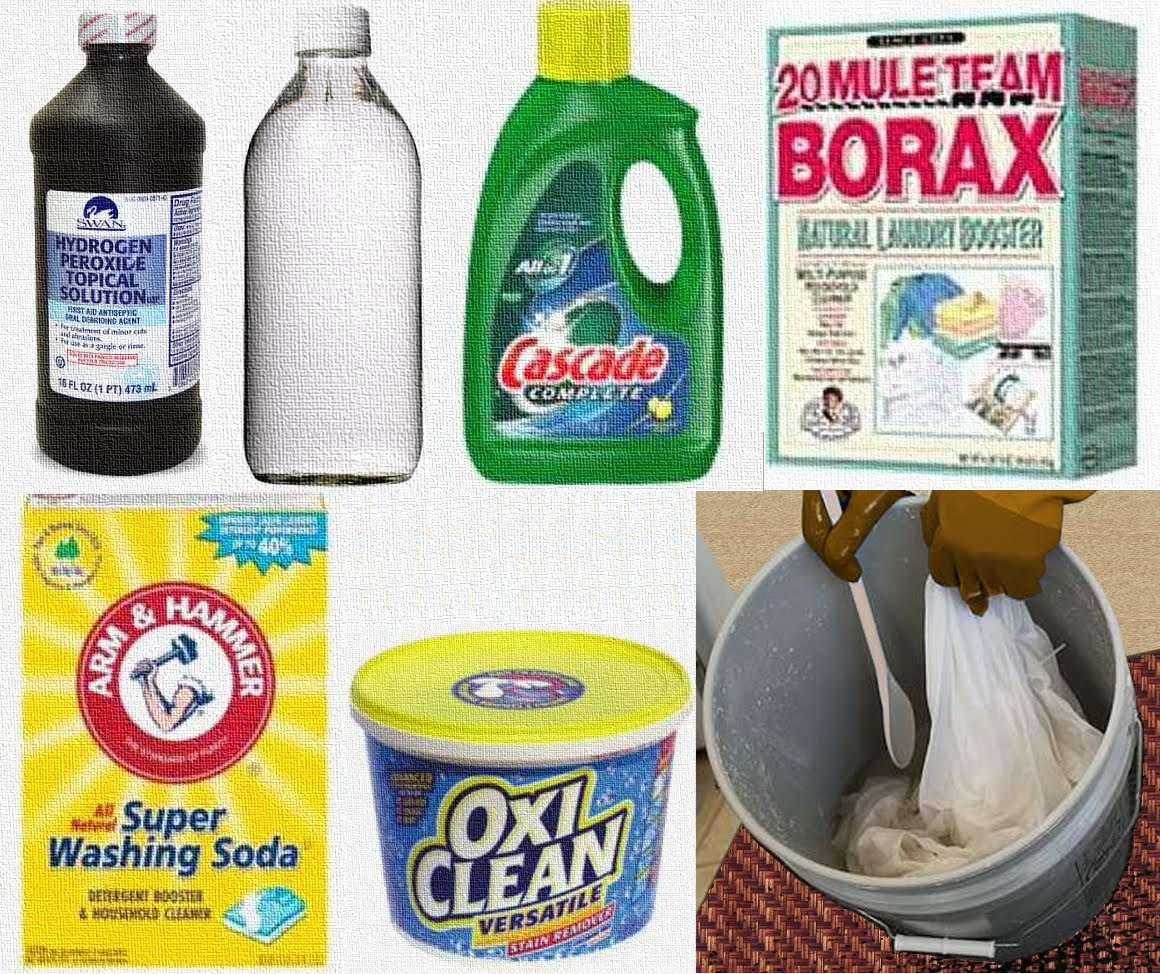 My family has elevated sweaty grimy greasy stains to an art form! This, combined with a limited budget for replacing clothing, has motivated me to find an all in one stain removing system that is easy and effective. I’ve used this recipe on jeans, brightly colored clothing and whites. I’ve not used it on many delicate fabrics, but if the garment was unusable because of an unsightly stain, I would give it a try. On the occasion that a stain is so firmly set that it will not be removed, I either dye it a darker color or send it to the scrap bin.


