headerphoto
Showing posts with label baking soda. Show all posts

WHOLE WHEAT PANCAKES, NO MILK, NO EGGS

Bookmark and Share
These pancakes are a filling and nutrient dense breakfast to feed your family when the pantry is looking a little bare. They are light, fluffy and delicious enough to be a special treat.

The night before blend 4 cups of fresh ground whole wheat flour with 3 to 3 1/2 cups of water and 1/4 cup of apple cider vinegar. Allow this to sit overnight or for 4 to 7 hours.

Wipe a cast iron pan with coconut oil and heat it to a medium high temperature on the stove top. (I keep a shallow saucer of coconut oil nearby and wipe the pan between batches of pancakes.) Meanwhile, blend 4 tablespoons of ground flax seed into 1 cup of filtered water. Let this sit and add the following to the soaked flour mixture:

3 tsp baking powder
1 tsp baking soda
1/2 tsp salt
1/4 cup honey
1 tsp cinnamon
1 tablespoon vanilla

Mix this thoroughly and then add the flax seed and water, blending again. This batter may be very thick. Add more water if needed.

Check the heated pan. It is ready when a few sprinkles of water will dance on its surface.

Use an ice cream scoop to measure the batter onto the pan. When a bubble of air breaks the surface and remains open, flip the cake to cook on the reverse side. To keep the finished pancakes warm, they can be placed in a tortilla warmer or on a cookie sheet placed in an oven warmed to its lowest temperature.
read more “ WHOLE WHEAT PANCAKES, NO MILK, NO EGGS ”

NATURAL ANTISEPTICS

Bookmark and Share
I’ve gotten some inquiries about natural antiseptics. Basically, an antiseptic is something that inhibits the growth of ‘bad’ organisms. Substances that kill pathogenic organisms internally are classified as antibiotic. Substances that accomplish this in surface applications are called antiseptic.A ‘bad’ organism would refer to those that are parasitic, meaning they rob the host of vital resources in order to reproduce. As the pathogen’s numbers multiply, the host’s resources are further taxed resulting in disease conditions. These organisms can be microscopic or large (like fungi). Some can live on inanimate surfaces for a time. Others thrive in living tissues.
An antiseptic will usually work by either killing the organism or preventing its growth or reproduction. Some antiseptics work primarily on bacteria while others target viruses. The benefit of natural antiseptics is that they are often more full spectrum in their action. In other words, natural antiseptics are often both antiviral and antibacterial.It gets a little complicated when you try to formulate a short list of natural antiseptics. The good news is that natural antiseptics are found all around you in many household foods, spices and pantry items. It would be difficult to find a home that did not have some natural antiseptic substance. The bad news (for me) is that it makes the topic VERY difficult to pare down for a short article.So, I’ll offer a brief overview. Keep in mind, these lists are by no means exhaustive. Some things I prefer to use more than others. These preferences are the result of research, availability, cost and my mood at the moment.Antiseptic foods you might have on hand include lemons, honey, pineapple, cabbage, carrots, onions and radishes. Spices and seasonings that are considered antiseptic include cinnamon bark, cloves, garlic, carob powder, ginger, horseradish, sage and thyme. For the antiseptic properties to be beneficial, most of these items should be used raw. Several of the seasonings can be utilized in the dry form.Herbals which are considered antiseptic include: myrrh, mullein, aloe, Echinacea, lavender, eucalyptus, St. John’s Wort, sweet clover, goldenseal, juniper, grapefruit seed extract, and tea tree oil.The third category of natural antiseptic is one I’ve named ‘other household items.’ Technically, these are substances that result from natural ingredients subjected to simple processes. However, in a pinch, and with some controlled conditions, you could produce your own version of them. They include activated charcoal, baking soda, vinegar, isopropyl rubbing alcohol, hydrogen peroxide, colloidal silver and molkosan.Of course, the simplest and easiest way to keep the skin free of pathogenic bacteria is by using clean, filtered water and well-made lye soap. Your skin is host to vibrant communities of bacteria, not all of them bad. There is a constant war being waged between the bad guys and the good guys. By regular hand washing, you help give the good guys an edge to keep your skin safe from disease caused by the bad guys. Pathogenic bacteria often feed on dirt. Soap removes the food source and helps depopulate the area of pathogens.Do avoid anti-bacterial soaps. Why? Because just as synthetic antibiotics can destroy beneficial flora in the human digestive tract, the result can be the same when used on the skin. Pharmaceutical antibiotic applications don’t just destroy the bad guys, but they kill the good also.This is an important consideration whether you are cleaning a wound or cleaning a counter top. Killing ALL bacteria means that you wipe the surface clear of even the beneficial organisms that help keep the bad in check. This leaves the area vulnerable to a renewed attack of pathogens as it has been stripped of its first line of defense: beneficial bacteria. Using natural antiseptics means that you help maintain a healthy balance just as you would by removing weeds from your garden while letting the cultivated plants remain. If you were to completely clear the ground without putting something in place of the weeds, the seeds from the weeds would soon sprout and take over the now vacant ground.

This video demonstrates how
plain soap & water
effectively fights pathogens:

read more “ NATURAL ANTISEPTICS ”

GINGERSNAPS WITH FRESH GINGER

Bookmark and Share
Few people remember the taste of REAL gingersnaps. If you’ve taken the time to read the label on a bag of gingersnaps, you’ll know that the genuine article just isn’t available in most stores. Not only that, but most recipes don’t even use fresh ginger root.

Now’s the time to fill the house with the smell of genuine homemade gingersnaps!

KAY’S GINGERSNAPS

NOTE: You will want to take the time to use fresh ginger root and coconut oil for this recipe. Coconut oil will give your cookies a snappy crunchiness that will make them quickly disappear. These can be frozen for serving later. . . . Otherwise you might find that they are gone before you get a chance to share them!

In a large bowl mix the following ingredients:

• 4 cups finely ground whole wheat flour
• 1 Tablespoon Arm & Hammer baking soda
• 1 teaspoon finely ground sea salt
• 2 cups sucanat
• 6 Tablespoons (or as much as ½ cup) finely ground fresh organic ginger root
• 2 teaspoons ground cinnamon
• 1/2 teaspoon ground cloves
• 1/2 teaspoon nutmeg
• 4 large eggs

In a small pan gently melt (don’t heat or cook) 1 ½ cup coconut oil and ½ cup unsulfured blackstrap molasses. Add this to the ingredients in your bowl. Make sure the oil is not too hot or you will cook the eggs!

Mix until completely combined. Cover and place the bowl into the refrigerator overnight.

TO BAKE:
Place your oven racks on the lower and middle level. Preheat the oven to 350°F
Line 3 or 4 cookie sheets with parchment paper. You can use pizza pans.

Make balls out of the cookie dough that are the size of one level tablespoon. The dough is stiff, so you may need to measure the first one and use a sturdy spoon to dig out the rest in sizes that match the first. Roll the dough between your hands. Use coconut oil on your hands to help keep it from sticking badly, but expect to get some on your hands.

Roll the balls in more sucanat and place onto the cookie sheets.

Rub some coconut oil onto the flat bottom of a glass. Use this to mash the balls of cookie dough down flat. Reapply a bit of coconut oil to the glass after pressing each cookie. Space the cookies 1 ½ to 2 inches apart on the parchment paper.

When one pan is ready, place it onto the lowest shelf in your oven and set the timer for 7 minutes.

After 7 minutes, move the pan from the bottom shelf to the upper shelf and place another pan on the bottom.

Set the timer for another 7 minutes.
When the timer goes off, remove the upper pan (the one that has been in the oven a total of 14 minutes) and set it aside to cool. Move the lower pan to the upper shelf and place the next pan of cookies on the lower shelf.

As each pan is removed from the oven, let it rest a minute and then move the cookies to a cooling rack. Let the pan cool, re-using the parchment paper for the next batch.

In this way, you’ll have 100 cookies cooling within an hour. Actually, the recipe makes a few more than 100 cookies, but by the time you finish taste testing, you SHOULD have 100.


Below find a short video on Ginger Root's benefits.
Also read BENEFITS OF GINGER ROOT.

read more “ GINGERSNAPS WITH FRESH GINGER ”

EASY BATHROOM CLEANUP TIPS

Bookmark and Share
When you don’t have time to wash a tile floor, baking soda is a quick, easy, non-abrasive floor cleaner and polisher. A homemade scouring powder made with a mixture of baking soda and Borax is also a good choice with the additional benefit that it discourages bugs.

Sprinkle baking soda onto the tile and grout lines. Push it with your broom into corners and crevices. Sweep the soda into your dust bin. Toss the soiled baking soda into the bathroom wastebasket where it will continue to help fight bathroom odors.

The baking soda will turn dark with the debris it picks up. This even works well on dried on stains and bits of hair. The baking soda clings to all of it and dries even oily residues so that they can be swept away. If you’re tired of reaching around the base of bathroom fixtures to get hard-to-reach areas, this makes things much easier.

One of my readers was dealing with stubborn black stains in the grout lines of her bathtub wall tiles.

Those stubborn stains are most often caused by mold, mildew and hard water. Baking soda addresses all of these issues as it is a water softener and it releases carbon dioxide from the surface, killing organisms that thrive in an anaerobic (without oxygen) environment.

Make a paste with baking soda and water. Apply the paste to the grout with an old toothbrush. For really stubborn areas, make the paste with hydrogen peroxide and baking soda. Let it sit for a while. Come back later and rub the toothbrush over the area and rinse it clean. An effective rinse is to mix vinegar and water. The acid in the vinegar further activates the sodium bicarbonate in the baking soda. Wipe the surface dry with a soft cloth.

The vinegar and water also adjusts the pH to a level that discourages mold and mildew from reforming. You can use this as a general surface spray between showers and baths.

Another help is to keep the tub and shower areas free of soap, toiletry bottles, washrags, towels and other items. Store these outside of the tub/shower area. The soap residue provides a place for mold and mildew to grow. The bottles and their storage racks hold water against walls and horizontal surfaces. With these removed, you’ll be better able to hit all of the nooks and crannies when you spray the shower/tub area with your diluted vinegar.

For convenience, use small plastic crates to hold needed supplies. Assign a storage area on a nearby shelf. Then, when someone uses the shower, he/she can just bring along the toiletry box and contents, rather than trying to manage an armload of assorted products.
read more “ EASY BATHROOM CLEANUP TIPS ”

STAIN REMOVAL & WHITENING SOAK

Bookmark and Share
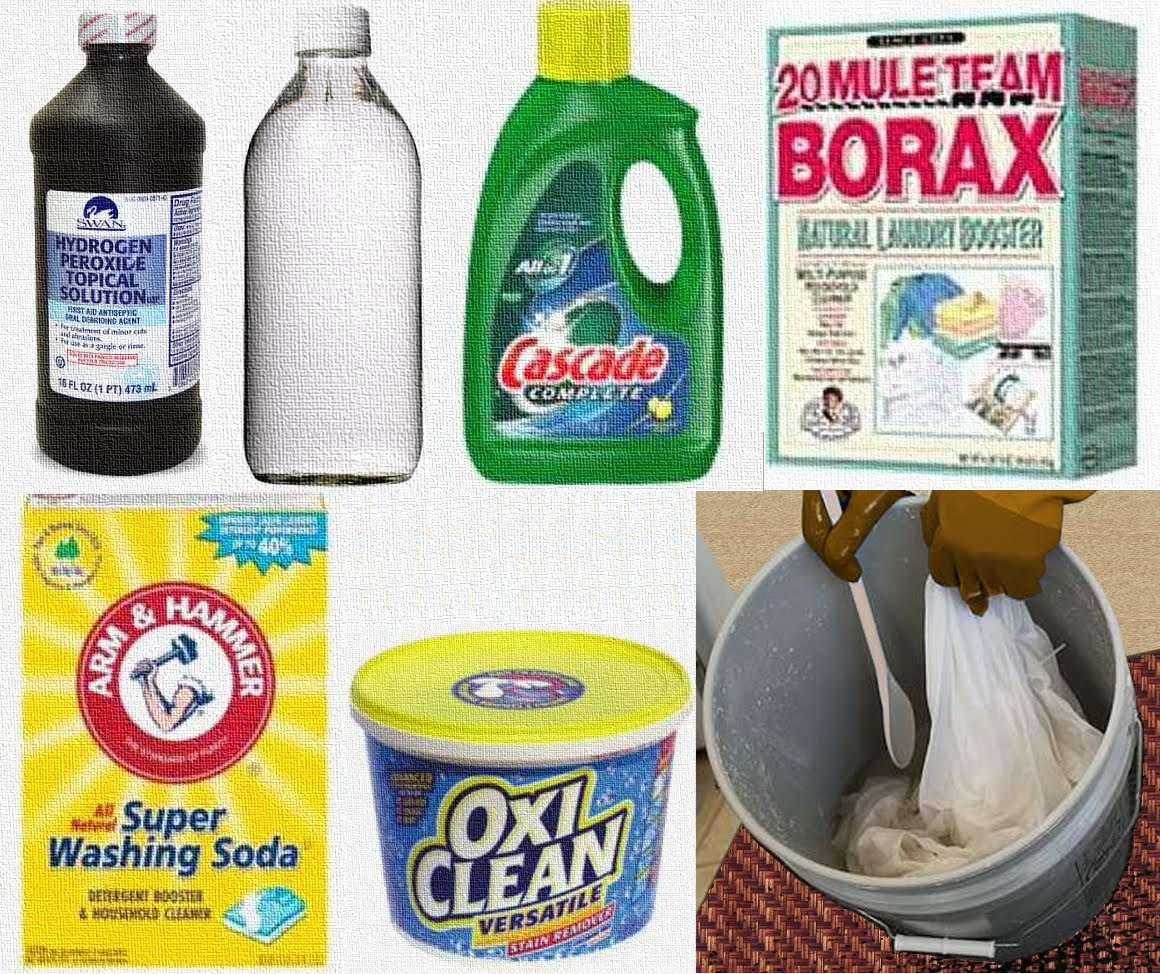
My family has elevated sweaty grimy greasy stains to an art form! This, combined with a limited budget for replacing clothing, has motivated me to find an all in one stain removing system that is easy and effective. I’ve used this recipe on jeans, brightly colored clothing and whites. I’ve not used it on many delicate fabrics, but if the garment was unusable because of an unsightly stain, I would give it a try. On the occasion that a stain is so firmly set that it will not be removed, I either dye it a darker color or send it to the scrap bin.

You will need two 5-gallon buckets with lids.

Combine the Following:
°2 cups borax
°2 cups washing soda
°1 cup OxiClean®
°1 cup Cascade Complete All-in-1 Gel
°1 cup hydrogen peroxide
°2 cups vinegar
°1 to 2 gallons of HOT water

Gradually add 1 to 2 gallons of HOT water while stirring the mixture. Be sure to stir well or the powder will clump into hard lumps. If this happens, you should be able to smash the clumps against the side of the bucket with a wooden spoon. Place the garments you wish to soak into a separate 5 gallon bucket. If I have a lot of items, I sometimes use 2 buckets, one for whites and another for colors. Pour the liquid over the fabric in the bucket. If using 2 buckets, equally divide the solution among them. Add more hot water so that the fabrics are immersed. Cover the bucket and allow it to soak overnight.

The next morning, dump the contents of the bucket into your washing machine (or wash tub) and send them through a rinse and spin cycle. Then, wash the clothes as you would normally. This works great for socks, dingy undershirts and linens. It would even be a good tool to use on yard sale finds.

This formula has evolved over time. Feel free to adjust it to suit your own needs.
read more “ STAIN REMOVAL & WHITENING SOAK ”

HOW TO MAKE DEODORANT WITH BAKING SODA

Bookmark and Share
Making deodorant at home is not a complicated endeavor. Why would you want to make your own? Because making your own deodorant will help you avoid aluminum toxicity.

Some form of aluminum is found in nearly all commercial deodorant and antiperspirant products. This ingredient is used because it helps block the pores and neutralize odor. However, once in the body, aluminum is a neurotoxin (brain poison) that has been linked to breast cancer, Alzheimer’s disease and other degenerative diseases.

Crystal deodorant stones are considered to be a safer alternative. These contain a different compound known as potassium alum or potassium aluminum sulfate. These molecules are natural salts and believed too large to be absorbed by your skin. Often, these are recommended to cancer patients for use as an alternative product as they are urged to get rid of toiletries containing aluminum.

However, there is a cheaper and safer alternative than this. You can make your own deodorant for pennies from items you likely have in your cupboard. Even if you don’t have all of the ingredients on hand, you will need such small quantities, that it is VERY economical to secure them. This simple natural recipe will also benefit your health by helping you avoid aluminum.

You will need: ½ cup or a little less of Coconut oil, 4 tablespoons of baking soda (Arm & Hammer contains no aluminum), 4 tablespoons of arrowroot powder, 2 tablespoons of grated beeswax and 10 drops of your favorite essential oil (optional).

Note:
Coconut oil will help fight odor causing bacteria while nourishing and moisturizing your skin. Essential oils can help eliminate odors, but be careful that they are not processed with harsh chemical extraction methods that could irritate the skin. Tea tree oil, lavender, frankincense, and citrus oils all have properties that can help eliminate odors.

Directions:
1. Gently warm the coconut oil and beeswax to a liquid state.
2. Blend the baking soda & arrowroot powder with a fork.
3. Slowly add the baking soda & arrowroot powder to the coconut oil and wax, working it in with a fork until completely mixed.

Your deodorant will have a firm paste-like texture, almost like commercial deodorant. The paste will continue to firm as it cools. More arrowroot can be added if it seems too wet or mushy. The beeswax will help it hold its shape even in warmer climates. If it becomes very stiff from cooler temperatures, you can place the container in a pocket for a few minutes to warm for ease of use.

Store this in a screw-top wide-mouth container. I use ones found in the ‘travel container’ section of most pharmacies. This permits each family member to have an individual jar.

This recipe yields about 1 cup and can last several months for one person with daily use.


The following video shows a variation of this recipe using a dry method of blending:

read more “ HOW TO MAKE DEODORANT WITH BAKING SODA ”

CAST IRON BUILDUP REMOVAL

Bookmark and Share
Cast iron cookware can become encumbered with gunk and rust. Thankfully, cast iron is very forgiving and with a little time can be stripped and refinished to its former glory. The method for removal is simple. The stripped metal gives you a good starting point to re-season your pan with a no-stick finish.

GET AS MUCH OFF AS YOU CAN BEFORE STRIPPINGpan in oven
Use hot water and vinegar to rinse after using salt and baking soda to clean as much of the debris off of your pan as possible. Dry the pan and place it into your oven, face down. You may want to line the bottom shelf with foil to catch drips. Set the temperature to 500 degrees, open a window and turn on an exhaust fan. Leave it baking for 1 hour, turn off the oven and allow the pan to cool inside your oven. This helps melt the excess grease off of your pan by taking it beyond its smoke point.

I include this step because if you have pans with a LOT of buildup, you will want to reduce the amount of oil left on the pans before you actually strip them down. In cooking applications, you wouldn’t want to heat oil past its smoke point because that releases free radicals (which are carcinogens). However, to get the oil off your pans, you will need to do this. Keep the room WELL ventilated.

Technically, this step could be skipped, but pans that have a thick layer of grease could catch fire. I recommend reducing the buildup first in order to decrease the likelihood of a grease fire BEFORE you subject the pan to the heat of a self-cleaning cycle -- during which the oven door will be automatically locked.

When the pan has cooled, remove it, wash and dry.

STRIPPING YOUR COOKWARE
Self-cleaning ovens are a convenient tool with which to strip your cast iron because they heat to approximately 900 degrees Fahrenheit (482 degrees Celsius). Such high temperature cycles burn off all food and oil debris. A safety feature keeps the oven door locked and closed during and immediately after the high-temperature cleaning cycle, which lasts approximately three hours, to prevent possible burn injuries. Usually, the door can be opened after the temperature cools to approximately 600 °F (300 °C).

You could actually skip the 500 degree baking and go straight to the self-cleaning step, but pans that have a thick layer of grease could catch fire. I recommend reducing the buildup as much as possible BEFORE you subject the pan to the self-cleaning cycle.

Many people leave their wire racks in the oven for this step, but it will strip and blacken your racks. Additionally, the consumer handbooks recommend removing the wire racks when using the self-cleaning cycle. I’ve found an alternative. Ceramic coffee mugs have already been kiln fired and can easily withstand the high temperatures. Simply position old mugs around the wire heating elements and perch the cast iron on top of them. Don’t use old bricks or stones, as these haven’t been glazed and may have water trapped inside, which would cause them to explode in the hot oven.

Keep the room well ventilated using an exhaust fan and an open window or door.

A RUSTIC ALTERNATIVE
If you don’t have a self-cleaning oven and have access to a fire pit, there is another alternative. Build a hot fire with hard wood. Soft, resinous woods will leave a blackened film on your pans. Once your fire is roaring hot, put your pan in the hot coals of the fire. Keep feeding the flame for a couple of hours. Allow it to die down and cool naturally. Remove your pan and scrub it clean.

RUST
You may find that there is a film of rust remaining on your cast iron. If this is the case, scrub this clear with coarse salt and baking soda. Rinse with hot water and dry carefully.


Follow safety precautions when working with heated metals, kitchen appliances and/or fire. This article is for information purposes only. The reader assumes all liability when utilizing these methods.
read more “ CAST IRON BUILDUP REMOVAL ”

HOMEMADE DISHWASHER POWDER

Bookmark and Share
There are a LOT of recipes for dishwashing soap. I don’t claim to have the best recipe, but I will share what works for me.

WHY NOT USE SOAP?
For dishwashers, you need cleaning power, not soapy suds. If you were to place regular soap flakes into a dishwashing machine, your kitchen floor would soon be filled with lots of bubbles. For a dishwasher, the detergent needs to break down grease, disinfect and rinse clean without leaving soap spots.

ESSENTIAL OILS?
I don’t use essential oils in my dishwasher powder. Very hot conditions will neutralize the scent of an essential oil. Good quality essential oils are pricey, so I prefer to use them in applications where they won’t be diminished. Feel free to add essential oil if that is your preference.

KAY’S DISHWASHER POWDER:
Mix together 2 cups Borax, 2 cups Baking Soda, ½ Cup salt and 1 cup citric acid.
This makes enough powder to just fit inside a quart sized zippered freezer bag. I place this inside a larger gallon sized zippered bag. This is to seal moisture out. The citric acid and baking soda will absorb moisture from the air and clump if the bag is not sealed. I use a DRY kitchen spoon to place a couple of tablespoons of powder in my machine per load. Using this, I’ve never had to use any spot-free solutions for the rinse/drying cycle.

This powder can also be used to wash dishes by hand. Vinegar in your rinse water is helpful for containers that have greasy residue.

A HANDY TIP:
I keep a soap dish next to my kitchen sink. The bottom of this dish has drainage holes. I place a sponge beneath these holes so that when the bar soap is used, it drains onto the sponge. If I need to spot clean a dish or a soiled surface, I simply moisten this sponge and use it.


This article is for information purposes only. Utilize these methods at your own risk and using your own discretion.
read more “ HOMEMADE DISHWASHER POWDER ”

SCOURING POWDER & SPRAY CLEANERS

Bookmark and Share
Grandma managed to keep her home clean long before there was an aisle in the grocery store devoted to perfumed products that promised to make her job easier. Dependence on retail cleaners can leave you wondering if you aren’t spending WAY too much on the latest chemical goo.

The good news is that you can keep more of your hard-earned money AND get your house clean without lots of toxic chemicals. Here are four simple products that you can make to clean several areas of your home.

SCOURING POWDER
This is a nice, non-abrasive cleaner that can be used by applying it to a wet sponge and rubbing in a circular motion. You can use Baking Soda alone, but for extra water softening and germ-fighting I use 1 part Borax, 2 parts Baking Soda and ½ part salt. This will take care of some stubborn stains without scratching delicate surfaces. I keep mine in a wide-mouthed container with shaker holes beneath a closeable lid.

ALL PURPOSE SPRAY/RINSE
Used as a rinse for the homemade scouring powder, this will create a foaming action. Mix white vinegar and water in equal parts. Place your solution in a pistol-grip sprayer. Spray surfaces you’ve used the scouring powder on, wipe with a damp sponge and rinse. It leaves a gleaming shine. The vinegar cuts the grease and also has anti-bacterial properties. By itself, this is also useful to wipe down tables, counter tops and clean glass and windows. If you use this as an after shower/bath spray it will also discourage mold on your grout.

HARD SURFACE, GLASS & DISINFECTANT/CLEANER
Mix 1 part rubbing alcohol with 1 part water. For every 2 cups of solution, add 3 tablespoons of white vinegar. Place into a spray container and use to clean hard surfaces that you want germ and streak-free. I like to use this to wipe down metal surfaces as it quickly dries without leaving spots. I also like to use it on light switches, doorknobs, and other surfaces that have a multitude of little hands on them.

SOAP SCUM & MOLD TREATMENT
Hard water causes soap to cling to surfaces in the shower and tub. This can lead to a problem with mold. A spray-on treatment for this is to use one part Hydrogen Peroxide and two parts water. Place it into a spray bottle and spray onto the surface. Let it sit for an hour and then clean with scouring powder.


This article is for information purposes only. Utilize these methods at your own risk and using your own discretion.
read more “ SCOURING POWDER & SPRAY CLEANERS ”

POISON OAK, POISON IVY & POISON SUMAC

Bookmark and Share
Poison oak, poison ivy and poison sumac all have the ability to cause severe allergic skin reactions in the many individuals. All of these plants contain urushiol which is a penetrating oil that binds to cells deep in the skin. This oil is released from bruised or broken leaves and stems. To avoid a painful rash, learn to identify the plants in order to avoid them.

POISON OAK
Poison oak grows as a shrub and is often found in areas where oak and pine trees grow. It is common in sandy soils. In the spring and summer, the leaves are deep green. Hanging clusters, yellowish green flowers display in the spring and turn to clusters of greenish white berries. In the fall the leaves can turn red, yellow, orange or reddish black. Native Americans once used the plant for black dye. Poison oak has no leaves in winter or early spring. The stems are grayish to light brown and can be up to five feet tall.

The leaves grow in threes off of one stalk. Two of these grow at a 90 degree angle off of the stalk and the third is attached to the end of the stalk. The leaves have randomly lobed edges that resemble leaves of the white oak tree, often ending in a rounded tip. Sometimes, the plant will have as many as five leaflets on a stalk, but three is most common.

POISON IVY
Poison ivy most commonly grows as a vine but also has some shrub varieties. As with Poison Oak, the leaves grow three to a stem, but can have as many as 5 to 7 per stem. The leaves are not lobed, but can be angularly notched and they taper to a point at the tip.


POISON SUMAC
This plant loves swampy areas and can grow 15 to 20 feet high. A single leaf will have a reddish stem which produces 7 to 30 green leaflets that have smooth edges. Sweet-smelling flowers are produced in the spring that produce bunches of cream-colored berries. In the fall, these leaves turn bright red and yellow.

Your next line of defense is to prevent contact with the plant. Wear gloves and clothing that covers arms and legs – shoes that cover feet when moving through brush or working around plants. Avoid crushing stems and leaves with your hands or scrubbing against them with your body.

Don't go near any burning brush pile. If there's poison oak, ivy or sumac in the pile, the oil takes to the air and can get into your lungs. You can develop serious lung inflammation as well as a rash over your entire body. The lung inflammation can sometimes be deadly.


CONSIDER USING SKIN BARRIER CREAMS
There are topical creams* on the market that can be applied prior to exposure. Some contain bentoquatam, a type of bentonite clay. These topical claylike lotions, which are available over the counter, form a protective barrier that guards skin against urushiol and keep it from binding to the skin’s natural oils. Before going out, rub some outdoor cream on exposed skin.

(*i.e.: Ivy Block Lotion, Hylands' Ivy Block Lotion, Enviroderm Ivy Block)


Urushiol is an oil that penetrates the top layer of skin and binds to cells deep in the epidermis. Bonding can take place in as little as 3 minutes, but on average is often closer to 30 minutes. Any solvent or soap will remove urushiol oil from the skin prior to bonding.

WHEN YOU'VE BEEN EXPOSED
Once you’ve come in contact with urushiol (or suspect that you have), immediately rinse with plain water.

Use a fine grit dry soil – not coarse, but the kind you’d find on a footpath -- as a powder on your exposed skin. The fine soil tends to absorb the oil. Use it to gently pat off the urushiol. Be sure to pat this as rubbing could spread the oils.

Wash the affected area as soon as possible with cool-to-warm water and a properly made lye soap. Lye soap is best because it does not strip the skin of its own protective oils. Other soaps will remove this protective coating from the skin and could help increase the rate of allergic response. Be sure to wash your hands and nails carefully. If urushiol remains on your hands then you can spread the oils to any other body parts you touch. Then lather again and let the area air dry.

Organic solvents can be used such as mineral spirits, rubbing alcohol, witch hazel. And never, never ever use petroleum derivatives (kerosene, gasoline, etc) on one's skin after one has been exposed to urushiol. Such products only damage one's skin and enhance the toxic oils ability to penetrate.

TREATING THE ITCH
There are at least four methods of treating the urushiol allergic rash: bath soaks, paste applications, topical liquid applications and poultices. Scratching does not spread the rash unless you still have urushiol on your hands. However, scratching WILL increase the itch response and make your recovery more unpleasant.

BATH SOAKS
Oatmeal -- Take a warm bath to which you've added a few tablespoons of plain oatmeal ground in a blender. The oatmeal will help dry a rash that has started to blister, and also relieves the itch. Use a wire strainer or cheesecloth to cover the drain and keep the oatmeal from clogging your pipes. Be careful when getting out -- oatmeal makes the tub very slippery.

Epsom salt -- to dry out the rash, relax in a bath containing Epsom salt. Follow the label directions.

PASTE APPLICATIONS
Pastes can be made with various products that will help draw the fluid from the blisters, reduce inflammation and speed healing while reducing the itch.

Plantain (Plantago major) is a common weed that works wonders as an itch and pain reliever. It is very healing to the skin. Grind up leaves and stems into a paste (either using a blender or even chewing them in your mouth), apply to skin.

Goldenseal root (Hydrastis Canadensis) have anti-inflammatory properties. Grind them into a paste and apply to affected areas. Some people add aloe vera gel to this application.

Jewelweed (Impatiens aurea) is often found near places where poison ivy grows. The leaves and the juice from the stem of Jewelweed are used by herbalists as a treatment for poison ivy, oak and other plant induced rashes, as well as many other types of dermatitis. Jewelweed works by counter-reacting with the chemicals in other plants that cause irritation. When you are out in the field and find you have been exposed to poison ivy, oak, or stinging nettle you can reach for the jewelweed plant and slice the stem, then rub its juicy inside on exposed parts. This will promptly ease irritation and usually prevents breakout for most people. Jewelweed leaves don’t dry well for keeping because of the high moisture and oil content of the leaves.

An alternative way to store jewelweed is to brew the chopped leaves in boiling water until you get a dark orange liquid. Yellow Jewelweed will not yield orange color and may not be effective. Strain the liquid and pour into ice cube trays. When you have a skin rash, rub it with a jewelweed cube onto the skin to benefit from its healing properties. It will keep in freezer up to a year. Use the fresh leaves as an ingredient in soap. Do not make alcoholic tinctures from Jewelweed because some people have had a bad reaction using jewelweed with alcohol.

Baking soda (and alum) mixed with water to form a paste (3 parts baking soda to 1 part water). Add Alum to this paste to increase its styptic effect.

TOPICAL LIQUID APPLICATIONS
White vinegar -- Use a vinegar compress to dry the rash and relieve itching. Mix a half-cup white vinegar with 1½cups water. Chill in the refrigerator. When you need cool relief, moisten a cloth in the solution and press it onto the rash.

Additional liquid ingredients that can be added to this include:

Lemon juice
Honey suckle leaves, steeped in HOT water until cooled to room temperature

Witch hazel -- using a cotton ball, treat your rash with witch hazel, which has a great reputation as a skin soother. The kind that comes in an alcohol solution cools your skin as it evaporates.

Cold milk -- soak a cloth in cold milk and hold it against your skin. Cold milk is more soothing to itchy skin than cold water. Exactly why milk relieves itching is unknown, but perhaps it's the milk fat.

POULTICE
Tea bags -- Moisten a plain old tea bag (black or green, it doesn't matter) and apply it to the itchy skin. The tannic acid in tea, which is astringent, helps contract inflamed tissue and relieve the itching.

OTHER TREATMENTS
Calamine lotion can be dabbed onto the rash. This remedy helps relieve itch and will help dry up blisters. If you find the lotion too runny, just mix in a little cornstarch.

Whatever method(s) you use, prompt treatment is always prudent. This article is for information purposes only. Utilize these methods at your own risk and using your own discretion.
read more “ POISON OAK, POISON IVY & POISON SUMAC ”

HOW TO MAKE CANDLE WICKS

Bookmark and Share
You may have seen a candle-making demonstration where participants are invited to dip strings into hot wax and then cool them in cold water. The finished product often looks more like a bent pepper than a candle. Should you decide to make usable candles, you’ll first want to know how to fashion wicks.

A WICK’S PURPOSE
Wicks aren’t just pieces of string in the center of a candle. The flame of a candle is not made by the wick. Rather, the heated wax creates a vapor which ignites as the flame is carried to the candle’s body by the wick. The flame you see is the vapor being consumed.

To produce a brightly burning, reliable candle, you will require a well-made wick. Use 100% cotton yarn or thread without any dye or bleach. Any thin cotton string, found in some craft or garden supply stores, will suffice.

Wire-core wicks are available commercially and are rigid, but these can contain lead and other metallic toxins that release vapors into the air when a candle is burned. I strongly advise against using these. It is better to have a wick stiffened by proper priming.

SOAK YOUR COTTON
Section at least three pieces of cotton yarn or string. If you are dipping candles, you will want the length of your twine to equal twice the height of your finished candle plus another twelve inches. The reason for this is that a single wick will have a candle formed at each end. If you prefer to make a single candle, cut the wick to equal the height of your candle plus another six inches.

Let the cotton soak in one these solutions all night:

1st Solution
One Tbs salt, two Tbs boric acid (makes the flame deep red), and 1 c. warm water

2nd Solution
2 Tbs salt, 4 Tbs Borax (makes the flame yellowish green) & 1 ½ cups warm water

3rd Solution
Two and a half tablespoons of salt with five and a half tablespoons of Borax in two cups warm water.

OPTIONAL CHEMICALS
Choose one of the following for a different color flame:
  • A tsp of calcium burns reddish orange.
  • A tsp of table salt brings a yellow flame.
  • A tsp of Borax has a yellowish-green appearance.
  • Add a teaspoon of potassium sulfate or saltpeter (potassium nitrate) for a purple flame.
  • A tsp of Epsom salts burns white.
  • A tsp of alum burns green.
The next morning, take the string from the solution and hang until dried completely – for as long as five days.

Braid the dried strands together as tightly as possible.

BRAIDS USED FOR WICKS
Use a flat braid for candles that are tapered. This flattened braid will have a slight curl when it burns. If the wick is matched properly to the size of the candle, the natural curl of the flat braid will reduce the carbon buildup and make the wick self trimming. The ply of a wick refers to the number of strands used to create it. A wick’s ply will tell you if the candle should be a larger or smaller size.

Block candles (without a tapered end) require a square braided wick. Block candles are formed by pouring wax into molds that can be round or square. The square braid is braided in the round and is not flat.

Whichever braid you select, it should be bound tightly. A candle will burn longer and brighter with a quality wick. A loose, poorly constructed wick will shorten the life of your candle.

HOW TO PRIME A WICK
Priming a wick helps to insure that your candles will light more easily. Your primed wick will burn more consistently. Additionally, the wax makes your wick water-resistant. Cotton wicks would easily absorb water otherwise.

Dipping your wick into hot wax until it is thoroughly saturated will prime your wick. When you see bubbles, you will know the wax is saturating your wick. To protect your fingers, you should use a small clip to hold the braid as you dip it. Take the wick out of the wax, tug it taught, lower it into water and then lay it onto waxed paper. Use a paper towel to dab off any excess water. Allow as least 30 seconds for each wick to dry. To encourage stiffness, repeat this process several times. When you are finished, primed wicks can be stored in rolled newspapers.

GUIDELINES FOR SAFETY
If wax boils, it is flammable. Baking soda or a fire extinguisher should be used to stop a fire involving wax. Water will just cause the wax (and the fire) to spread; don’t use it.

Use a double boiler to heat wax; it shouldn’t be placed directly on the heat source. Make your own by placing water at a 3-inch or so depth in a large pot. Put something (i.e. old tuna can or metal cookie cutter) onto the bottom of this pot to act as a barrier between it and the wax container. Bring the water to a boil. Place the wax into a can and lower this onto the barrier in the pot of boiling water.

It is best to work with hot wax while children and pets are away.

Hot wax should never be discarded down a drain. When the wax hardens, it will clog your pipes.

FEATURED VIDEO

read more “ HOW TO MAKE CANDLE WICKS ”